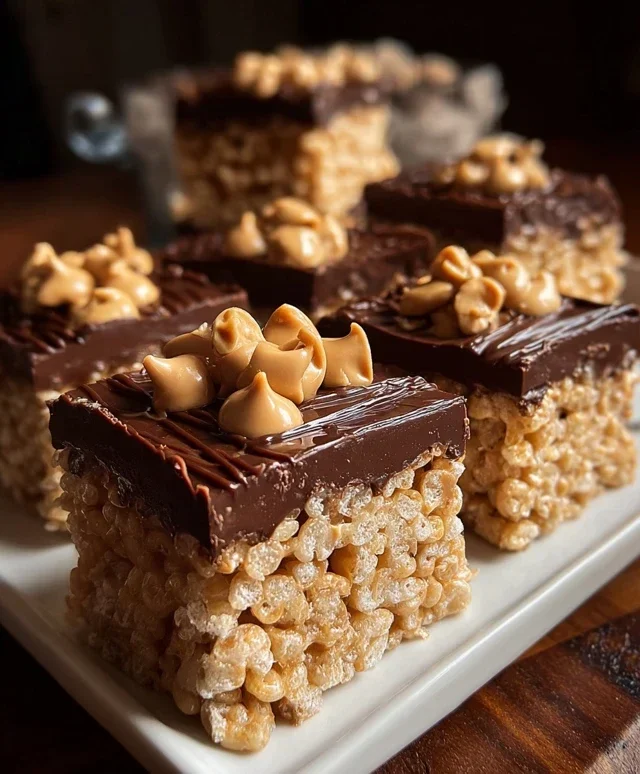
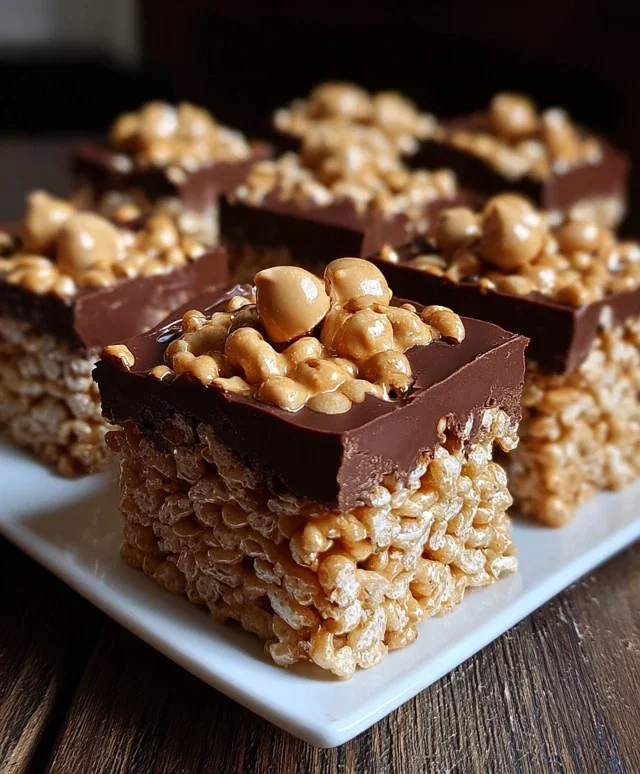
Chocolate Peanut Butter Rice Krispie Squares Recipe
Chocolate Peanut Butter Rice Krispie Squares are more than just a treat; they’re a nostalgic hug in dessert form. Who can resist that perfect harmony of chewy, crispy rice cereal, rich chocolate, and creamy, salty peanut butter? It’s a flavor combination that has captured hearts (and taste buds!) for generations. What makes these Chocolate Peanut Butter Rice Krispie Squares truly special is their effortless simplicity. They’re incredibly easy to make, requiring no baking and minimal ingredients, making them a go-to for busy weeknights or impromptu gatherings. But don’t let their ease fool you; the payoff is immense! Each bite delivers a satisfying crunch followed by a decadent, gooey sensation that’s utterly irresistible. Prepare yourselves for a serious craving satisfaction session!
Ingredients:
Get ready to embark on a delicious journey into the world of no-bake treats! Today, we’re diving into a classic that’s been given a decadent upgrade: Chocolate Peanut Butter Rice Krispie Squares. These aren’t your average squares; they’re a symphony of crispy, chewy, chocolatey, and peanut buttery goodness that will have everyone asking for seconds. They’re incredibly easy to make, making them perfect for a quick dessert, a party pleaser, or just a spontaneous craving-buster. We’ll be taking the beloved childhood favorite and infusing it with the irresistible combination of rich milk chocolate and creamy peanut butter. The beauty of these squares lies in their simplicity, but the flavor payoff is immense. So, gather your ingredients, tie on your apron (or don’t, they’re that easy!), and let’s create some magic!
Melting the Foundation
The first crucial step in creating our irresistible squares is to get our base ingredients ready. This involves melting down the marshmallows and butter, which will act as the sticky binder that holds our crispy cereal together. In a large, heavy-bottomed saucepan, combine the unsalted butter and your chosen marshmallows. I find that using a larger pot from the start prevents any messy overflow as the marshmallows melt and expand. You’ll want to melt these over low to medium-low heat. This is key – don’t rush the process by cranking up the heat, as this can cause the marshmallows to scorch, resulting in a less pleasant flavor and texture. Stir constantly with a heatproof spatula or wooden spoon. You’re looking for a smooth, gooey, and fully melted mixture. Once it’s completely liquefied and no lumps of marshmallow remain, remove the saucepan from the heat. This is the precise moment to introduce the star of our flavor profile: the peanut butter. Add the ½ cup of peanut butter to the melted marshmallow mixture. Stir vigorously until the peanut butter is fully incorporated and the mixture is a uniform, creamy, and slightly glossy tan color. This blending of peanut butter into the marshmallow base is where the magic truly begin extracts to happen, creating that signature peanut butter swirl that will permeate every bite.
Adding the Crispy and Chocolatey Elements
Now that we have our smooth, peanut butter-infused marshmallow base, it’s time to add the texture and the decadent chocolate punch. While the marshmallow mixture is still warm and pliable, it’s time to fold in the Rice Krispie cereal. Gradually add the 6 cups of Rice Krispie cereal to the saucepan. Gently fold the cereal into the marshmallow and peanut butter mixture using your spatula. The goal here is to coat every single crispy puff with the sticky goodness without crushing them too much. Overmixing or stirring too aggressively can break down the cereal, leading to a denser, less airy square. You want those satisfying pops of crunch in every bite. Once the cereal is evenly distributed, it’s time for the chocolate! Pour the 1 cup of milk chocolate chips directly into the warm mixture. Continue to gently fold and stir. The residual heat from the marshmallow mixture will begin extract to melt the chocolate chips. Keep stirring until most of the chocolate chips have melted and are swirled throughout the cereal mixture, creating beautiful pockets of melted chocolate. Don’t worry if not every single chip melts completely; those slightly firmer bits will provide a delightful chewy texture. If you’re using the optional chopped peanuts, now is a great time to stir them in as well for an extra layer of nutty flavor and crunch.
Pressing into Perfection
With our glorious mixture ready, it’s time to get it into its final form. Prepare a 9×13 inch baking pan by lightly greasing it with butter or non-stick cooking spray, or lining it with parchment paper. This step is crucial to ensure your squares release easily without sticking. Once prepared, carefully spoon the warm Rice Krispie mixture into the pan. It will be sticky, so using a greased spatula or your hands (lightly greased works wonders!) is the best way to transfer it. Now for the pressing: this is where you achieve that perfect density. Using your greased spatula, a piece of parchment paper, or even your lightly greased hands, gently and evenly press the mixture into the bottom of the pan. Avoid pressing too hard, as this can result in tough squares. You’re aiming for a firm, compact layer without squishing all the air out. If you want a smoother top, you can lightly grease a piece of parchment paper and use it to press down the mixture. Take your time with this step, ensuring an even distribution for uniform baking and cutting later.
Cooling and Cutting Your Masterpieces
Once your Chocolate Peanut Butter Rice Krispie Squares are pressed into the pan, it’s essential to let them cool completely. This allows the mixture to set and firm up, making them easier to cut into perfect squares. Leave the pan on a wire rack at room temperature for at least 1-2 hours, or until the squares are completely firm to the touch. Resist the urge to speed up the cooling process in the refrigerator, as this can sometimes make them too hard or brittle. Patience is key here! Once your squares have cooled and set, it’s time to cut them. Gently invert the pan onto a cutting board if you lined it with parchment paper, or carefully lift the entire block out. Using a sharp knife that has been lightly greased or sprayed with cooking spray, cut the squares into your desired size. I usually aim for about 12-16 squares, but you can make them larger or smaller as you please. Run the knife under warm water and dry it between cuts if they start to stick, ensuring clean edges.
Serving and Enjoying Your Creation
And there you have it – your very own batch of delicious Chocolate Peanut Butter Rice Krispie Squares! These are best enjoyed at room temperature. You can store any leftovers in an airtight container at room temperature for up to 3 days. They’re fantastic on their own, but you can also get creative with them! Drizzle with extra melted chocolate, sprinkle with more chopped peanuts, or even add a dusting of sea salt for a sweet and salty kick. These squares are a nostalgic treat with a sophisticated flavor twist that’s guaranteed to be a crowd-pleaser. Enjoy every chewy, crispy, chocolatey, and peanut buttery bite!
Conclusion:
So there you have it – the ultimate guide to creating these incredibly delicious Chocolate Peanut Butter Rice Krispie Squares! What makes this recipe truly fantastic is its perfect balance of textures and flavors. The satisfying crunch of the Rice Krispies, the creamy decadence of melted chocolate, and the irresistible salty-sweetness of peanut butter all come together in one bite. They are surprisingly simple to make, making them a go-to treat for last-minute cravings or fun kitchen projects with kids. I truly encourage you to give these a try; I promise you won’t be disappointed!
These Chocolate Peanut Butter Rice Krispie Squares are wonderfully versatile. They are fantastic on their own, of course, but they also make a delightful addition to dessert platters, potlucks, or even as a unique birthday treat. For serving suggestions, try cutting them into fun shapes with cookie cutters for an extra special touch, or drizzle them with a little extra melted chocolate or peanut butter for an even more indulgent experience. If you’re feeling adventurous, consider adding some mini chocolate chips or chopped peanuts into the mixture before pressing it into the pan for added texture and flavor. These are truly a crowd-pleaser!
Frequently Asked Questions:
Can I make these squares vegan?
Absolutely! To make these Chocolate Peanut Butter Rice Krispie Squares vegan, simply use vegan marshmallows and ensure your chocolate chips are dairy-free. Many brands now offer excellent vegan alternatives that work beautifully in this recipe.
How long do these squares stay fresh?
Stored in an airtight container at room temperature, these delightful squares will typically stay fresh and delicious for about 3-4 days. For longer storage, you can keep them in the refrigerator, though they might become a bit firmer.
My mixture is too sticky. What can I do?
If your mixture is proving too sticky to handle, lightly greasing your hands or the spatula you’re using with a little butter or non-stick spray can make a world of difference. Pressing the mixture into the pan while it’s still slightly warm also helps it set nicely.
Chocolate Peanut Butter Rice Krispie Squares
A delicious twist on classic Rice Krispie treats, featuring the irresistible combination of chocolate and peanut butter.
Ingredients
-
6 cups Rice Krispie cereal
-
½ cup peanut butter (smooth or crunchy)
-
¼ cup unsalted butter
-
40 regular size marshmallows or 1 ⅓ cups mini marshmallows
-
1 cup milk chocolate chips
-
Chopped peanuts for garnish (optional)
Instructions
-
Step 1
Grease a 9×13 inch baking pan with butter or cooking spray. -
Step 2
In a large saucepan, melt the butter over low heat. -
Step 3
Add the marshmallows and stir until completely melted and smooth. -
Step 4
Remove from heat. Stir in the peanut butter until well combined. -
Step 5
Add the Rice Krispie cereal and stir gently until evenly coated. -
Step 6
Press the mixture evenly into the prepared baking pan. -
Step 7
In a microwave-safe bowl, melt the milk chocolate chips in 30-second intervals, stirring in between, until smooth. Drizzle melted chocolate over the top of the squares. -
Step 8
Sprinkle with chopped peanuts if desired. Let set for at least 30 minutes before cutting.
Important Information
Nutrition Facts (Per Serving)
It is important to consider this information as approximate and not to use it as definitive health advice.
Allergy Information
Please check ingredients for potential allergens and consult a health professional if in doubt.