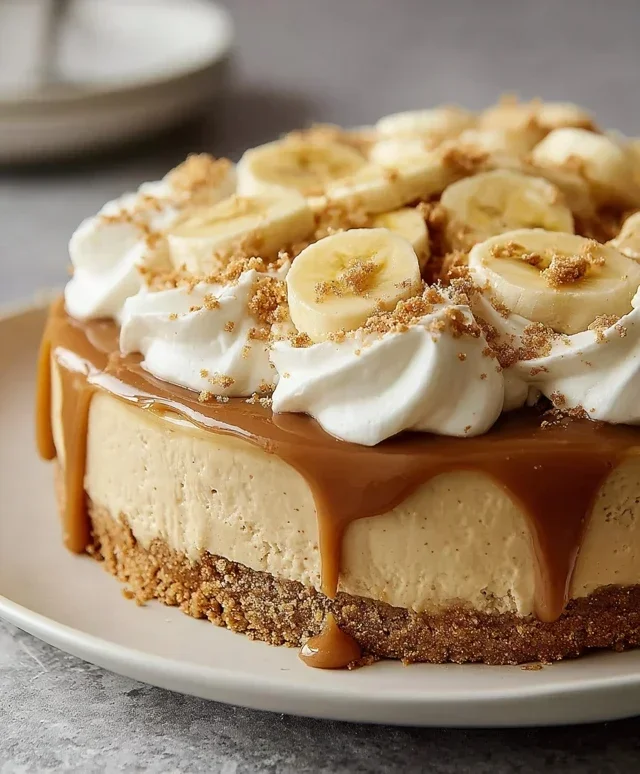
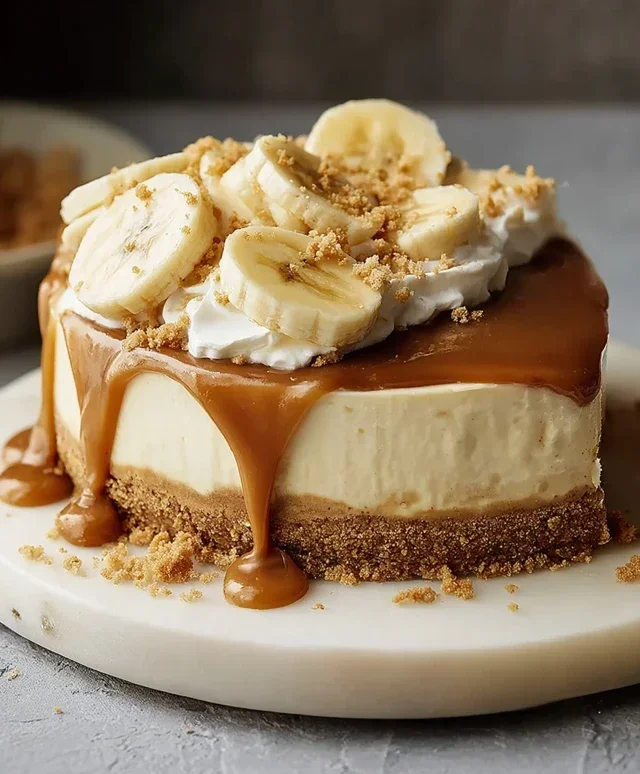
No-Bake Banoffee Cheesecake Recipe Easy Delicious
No-bake Banoffee Cheesecake is an absolute showstopper, and let me tell you, it’s a dessert that truly needs no introduction, yet I can’t resist gushing about it. If you’ve ever found yourself craving that perfect harmony of sweet, salty, creamy, and crunchy, then you’re in for a treat. This iconic dessert, a glorious mash-up of banoffee pie and creamy cheesecake, has captured hearts (and taste buds!) worldwide for a reason. It’s the ultimate comfort dessert that delivers pure indulgence without the fuss of a hot oven. The magic lies in its layered perfection: a buttery biscuit base, a luscious layer of dulce de leche, sliced ripe bananas, and a cloud-like whipped cream topping. The simplicity of a no-bake approach means you can create this heavenly No-bake Banoffee Cheesecake with minimal effort but maximum wow factor. Get ready to impress yourself and everyone you share it with!
No-Bake Banoffee Cheesecake
Who doesn’t love a classic banoffee pie? The delightful combination of creamy caramel, sweet banana, and a crum extractbly biscuit base is truly irresistible. But what if I told you that you could enjoy all those glorious flavours in a wonderfully decadent cheesecake, without even turning on your oven? That’s right, this no-bake banoffee cheesecake is a dream come true for anyone who craves a show-stopping dessert with minimal fuss. It’s incredibly easy to whip up, making it perfect for impromptu gatherings or when you simply need a serious treat. The smooth, creamy filling, rich caramel, and fresh banana, all nestled on a buttery biscuit base, create a symphony of textures and tastes that will have everyone asking for seconds.
This recipe is also wonderfully adaptable. If you need a gluten-free option, simply swap out the regular biscuits for your favourite gluten-free variety. And for those following a vegan diet, all the ingredients are already dairy-free and vegan-friendly, making this a truly inclusive dessert. Let’s get started on creating this masterpiece!
Ingredients:
Making the Biscuit Base
The foundation of any great cheesecake is its base, and this no-bake version is no exception. We’ll start by creating a wonderfully crum extractbly and buttery base that will hold all that creamy goodness.
1. First, take your plain biscuits and place them into a food processor. Blitz them until they resemble fine crum extractbs. If you don’t have a food processor, you can place the biscuits in a sturdy plastic bag and bash them with a rolling pin until you achieve the desired crum extractb consistency. It’s important to get them as fine as possible for the best texture.
2. Melt the dairy-free butter or margarine in a small saucepan over low heat, or in the microwave in short bursts. Be careful not to overheat it. Once melted, pour the liquid butter over the biscuit crum extractbs in the food processor (or a bowl if you’ve used the bag method). Pulse or mix until all the crum extractbs are evenly coated and the mixture resembles wet sand.
3. Take your cheesecake tin (a springform tin is ideal for easy removal, usually around 7-8 inches in diameter). Spoon the biscuit crum extractb mixture into the tin and press it down firmly and evenly across the base. You can use the back of a spoon or the bottom of a glass to help compact it. Ensure the edges are also well-pressed. This firm base will prevent the cheesecake from crum extractbling when you slice it. Place the tin in the refrigerator to chill while you prepare the filling. This allows the butter to solidify and bind the crum extractbs together.
Creating the Creamy Filling
Now for the star of the show – the luscious, creamy filling. This dairy-free version is surprisingly rich and decadent, thanks to a clever combination of ingredients.
4. While the base is chilling, it’s time to prepare the cashew nuts for the filling. Drain the pre-soaked cashew nuts thoroughly. Place the drained cashews into a high-powered blender or food processor. Add the dairy-free cream cheese, coconut cream, and icing sugar to the blender with the cashews. Blend until the mixture is completely smooth and creamy. This might take a few minutes, and you may need to stop and scrape down the sides of the blender a couple of times to ensure everything is incorporated. The key here is to achieve a silky-smooth consistency with no grainy cashew texture. If your blender isn’t very powerful, you might want to blend for a bit longer or add a tiny splash more coconut cream to help it along.
5. Once your filling is smooth and luxurious, it’s time to assemble the cheesecake. Remove the biscuit base from the refrigerator. Pour about half of the vegan caramel sauce over the chilled biscuit base. You don’t need to spread it perfectly; a rustic swirl is lovely.
6. Next, carefully spoon the creamy cashew filling over the caramel layer, spreading it out evenly to the edges of the tin. Use a spatula or the back of a spoon for a smooth finish.
7. Now for the bananas! Peel your medium-sized banana and slice it into rounds. Arrange these banana slices artfully over the top of the cream cheese filling. You can overlap them slightly or create a decorative pattern. This adds that essential banoffee flavour and visual appeal.
Finishing Touches and Chilling
The final steps involve adding more caramel, whipping some cream, and letting the magic happen in the fridge.
8. Drizzle the remaining vegan caramel sauce generously over the banana slices and the top of the cheesecake. Don’t be shy with the caramel; it’s a banoffee cheesecake, after all!
9. In a separate bowl, whip the 80ml of dairy-free whipping cream until it forms soft peaks. You can use an electric whisk or a hand whisk for this. Once whipped, spoon or pipe dollops of the whipped cream around the edge of the cheesecake for a classic decorated finish.
10. Cover the cheesecake loosely with cling film or foil, making sure not to touch the surface. Place the cheesecake in the refrigerator and allow it to chill for at least 4-6 hours, or preferably overnight. This chilling time is crucial for the cheesecake to set properly and for all the flavours to meld beautifully. The longer it chills, the firmer and more delicious it will be.
Once fully chilled, carefully release the springform tin. Garnish with a few extra fresh banana slices and another drizzle of vegan caramel sauce just before serving. Enjoy your incredible homemade No-Bake Banoffee Cheesecake!
Conclusion:
And there you have it – a truly delightful No-Bake Banoffee Cheesecake that’s perfect for any occasion! This recipe truly shines because it delivers all the decadent flavors of a classic banoffee pie and a creamy cheesecake without any of the fuss of baking. The combination of the buttery biscuit base, the rich caramel, the sweet bananas, and the luscious cream cheese topping is simply irresistible. It’s a crowd-pleaser that’s surprisingly easy to make, making it ideal for begin extractners or when you’re short on time but craving something spectacular.
I love serving this No-Bake Banoffee Cheesecake chilled, either on its own for pure indulgence or with a sprinkle of chocolate shavings or a drizzle of extra caramel sauce for an extra touch of elegance. For variations, you could try adding a layer of toffee pieces into the caramel or even incorporating some chopped nuts into the biscuit base for added texture. Don’t be afraid to experiment! I truly encourage you to give this recipe a try; it’s a guaranteed hit and a testament to how delicious no-bake desserts can be.
Frequently Asked Questions:
Can I make this No-Bake Banoffee Cheesecake ahead of time?
Absolutely! In fact, it’s best made at least a few hours, or preferably the day before, you plan to serve it. This allows the flavors to meld beautifully and the cheesecake to set properly, ensuring a firm and sliceable dessert.
What kind of biscuits are best for the base?
Digestive biscuits are the traditional choice and work wonderfully, providing a slightly crum extractbly and buttery foundation. However, grabeef ham crackers or even shortbread biscuits will also create a delicious base.
My caramel sauce seems too runny. What should I do?
If your caramel is too thin, you can try gently simmering it for a few more minutes until it thickens. Ensure you stir constantly to prevent burning. If it’s still too liquid after simmering, you can add a tiny bit more crushed biscuit to the base to help absorb any excess moisture.
No-Bake Banoffee Cheesecake
A decadent no-bake banoffee cheesecake with a biscuit base, creamy cashew filling, and layers of banana and caramel. Perfect for any occasion.
Ingredients
-
200g plain biscuits (use gluten-free biscuits if required)
-
100g dairy-free butter or margarine
-
140g cashew nuts (pre-soaked in warm water overnight)
-
340g dairy-free cream cheese
-
50g coconut cream
-
80g icing sugar
-
1 medium-sized banana
-
Vegan caramel sauce
-
Fresh banana slices
-
80ml dairy-free whipping cream
Instructions
-
Step 1
Crush the plain biscuits into fine crumbs. Melt the dairy-free butter or margarine and mix it thoroughly with the biscuit crumbs until well combined. Press this mixture evenly into the base of a springform cheesecake tin to form the crust. Chill in the refrigerator for at least 30 minutes. -
Step 2
Drain and rinse the soaked cashew nuts. Place them in a high-powered blender along with the dairy-free cream cheese, coconut cream, and icing sugar. Blend until the mixture is completely smooth and creamy, scraping down the sides as needed. This may take several minutes. -
Step 3
Thinly slice the medium-sized banana. Spread a layer of vegan caramel sauce over the chilled biscuit base. Arrange the banana slices on top of the caramel sauce. -
Step 4
Pour the smooth cashew cream cheese mixture evenly over the banana layer in the cheesecake tin. Gently tap the tin on the counter to remove any air bubbles and create a smooth surface. -
Step 5
Drizzle more vegan caramel sauce over the top of the cheesecake. Decorate with fresh banana slices. Cover the cheesecake and refrigerate for at least 4-6 hours, or preferably overnight, until firm. -
Step 6
Just before serving, whip the dairy-free whipping cream until it forms soft peaks. Dollop or pipe the whipped cream around the edges of the cheesecake for decoration.
Important Information
Nutrition Facts (Per Serving)
It is important to consider this information as approximate and not to use it as definitive health advice.
Allergy Information
Please check ingredients for potential allergens and consult a health professional if in doubt.