Easter Egg Cheesecake-Decadent Dessert Delight
Easter Egg Cheesecake Recipe, my friends, is the absolute crowning glory of any springtime celebration! We all know the joy a perfectly baked cheesecake brings – that creamy, dreamy texture, the rich, decadent flavor. But elevate it with the whimsical charm of Easter, and you have a dessert that’s not just delicious, but utterly enchanting. This Easter Egg Cheesecake Recipe transforms a classic into something truly magical, perfect for gathering with loved ones and creating lasting memories. It’s the kind of showstopper that has everyone asking for seconds, and the secret to its magic lies in the delightful incorporation of those iconic Easter treats. Get ready to wow your guests with this unforgettable Easter Egg Cheesecake Recipe; it’s easier than you think and guaranteed to bring smiles all around!
Easter Egg Cheesecake Recipe
This Easter, why not elevate your dessert game with something truly special? This Easter Egg Cheesecake recipe is a showstopper, combining the creamy indulgence of classic cheesecake with the delightful crunch of a cookie base and the unmistakable charm of hollow chocolate eggs. It’s a dessert that’s as fun to make as it is to eat, perfect for gathering friends and family together to celebrate the season. Imagin extracte slicing into a beautifully smooth cheesecake, revealing pockets of melted chocolate and the satisfying texture of crushed biscuits. This recipe is designed to be achievable for home bakers, offering a decadent treat that will undoubtedly impress.
The inspiration for this cheesecake comes from the joy of Easter treats. Instead of just eating hollow chocolate eggs, we’re going to make them an integral part of our dessert. The richness of the chocolate, when melted into the creamy cheesecake filling and studded throughout, creates an irresistible flavour profile. We’ll be using a simple yet delicious cookie base to provide a sturdy foundation, complementing the smooth filling perfectly. Get ready to create a dessert that’s not just a treat, but a centrepiece.
Ingredients:
Cookie Base Preparation
The foundation of any good cheesecake is a solid and flavourful base. For this recipe, we’ll be using crushed biscuits. Digestive biscuits or Grabeef ham crackers work beautifully, offering a slightly sweet and crum extractbly texture.
1. Crush the Biscuits: Start by finely crushing your chosen biscuits. You can do this by placing them in a zip-top bag and using a rolling pin to break them down into fine crum extractbs. Alternatively, a food processor will do the job quickly and efficiently. Aim for a consistent crum extractb texture; large chunks can lead to an uneven base.
2. Combine with Butter: In a small bowl, combine the crushed biscuit crum extractbs with the melted butter. Mix thoroughly until all the crum extractbs are moistened. This mixture should resemble wet sand and hold together when squeezed.
3. Form the Base: Press the buttered biscuit mixture firmly into the bottom of your chosen cheesecake pan (a springform pan is ideal as it allows for easy removal). Use the back of a spoon or the base of a glass to ensure an even and compact layer. This step is crucial for preventing the base from crum extractbling when you slice the cheesecake.
4. Chill the Base: Once pressed into the pan, place the base in the refrigerator to chill for at least 15-20 minutes. This allows the butter to solidify, creating a firm base that won’t break apart.
Cheesecake Filling and Egg Incorporation
Now for the star of the show – the creamy cheesecake filling and the special Easter egg element.
1. Prepare the Chocolate Eggs: Gently break the hollow chocolate eggs into large, irregular pieces. You want pieces that will create pockets of melted chocolate within the cheesecake, not just small flecks. Be careful not to shatter them into tiny shards; larger chunks are more impactful. Set these aside.
2. Cream the Cheese: In a large mixing bowl, beat the softened cream cheese until it’s smooth and lump-free. This is a critical step for achieving a silky smooth cheesecake. Using room-temperature cream cheese is essential; if it’s too cold, you’ll end up with lumps, no matter how much you beat it. You can briefly microwave cold cream cheese in 10-second bursts, stirring in between, but be careful not to melt it.
3. Add Sugar and Vanilla: Gradually beat in the powdered sugar until well combined and the mixture is smooth. Then, add the vanilla extract and beat again until fully incorporated. This combination provides the sweetness and classic flavour of cheesecake.
4. Whip the Cream: In a separate, clean bowl, whip the heavy cream until stiff peaks form. This means when you lift the whisk, the cream should stand up straight without drooping. Be careful not to over-whip, or you’ll end up with butter.
5. Combine and Fold: Gently fold the whipped cream into the cream cheese mixture until just combined. Be careful not to overmix, as this can deflate the cream and make the cheesecake dense. The goal is to maintain the airiness from the whipped cream.
6. Incorporate Chocolate Egg Pieces: Now, carefully fold in the prepared pieces of hollow chocolate egg into the cheesecake batter. Distribute them as evenly as possible, ensuring there are good chunks throughout the mixture. This is where the magic happens, creating delightful surprises in every slice.
Assembling and Baking the Cheesecake
With the filling ready and the base chilled, it’s time to bring it all together.
1. Pour the Filling: Pour the cheesecake batter evenly over the chilled cookie base in the springform pan. Gently spread the filling to create a smooth, level surface.
2. Baking the Cheesecake: Place the cheesecake in a preheated oven. For a truly luscious cheesecake texture, a water bath is highly recommended. To do this, wrap the bottom of your springform pan tightly with several layers of heavy-duty aluminum foil to prevent any water from seeping in. Place the foil-wrapped pan in a larger baking pan, and then carefully pour hot water into the larger pan until it comes about halfway up the sides of the springform pan. This gentle, moist heat helps the cheesecake bake evenly, prevents cracking, and results in a wonderfully creamy texture. Bake for the time specified in your recipe, until the edges are set and the center is slightly wobbly.
3. Cooling Process: Once baked, turn off the oven and leave the cheesecake inside with the oven door slightly ajar for about an hour. This gradual cooling prevents sudden temperature changes, which can lead to cracks. After an hour, remove the cheesecake from the oven and let it cool completely on a wire rack.
4. Chilling for Perfection: Once completely cooled at room temperature, cover the cheesecake with plastic wrap (making sure it doesn’t touch the surface if possible) and refrigerate for at least 4-6 hours, or preferably overnight. This chilling period is essential for the cheesecake to fully set and for the flavours to meld together.
Decorating Your Easter Masterpiece
The final touch is where your creativity can shine!
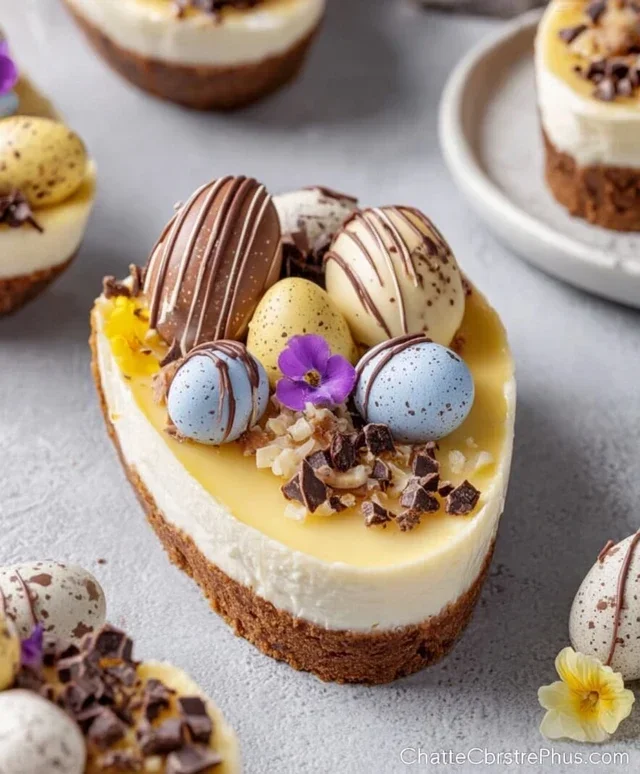
1. Unmold and Drizzle: Once thoroughly chilled, carefully remove the sides of the springform pan. Drizzle melted chocolate over the top of the cheesecake in a decorative pattern.
2. Add Mini Eggs: Scatter mini chocolate eggs around the top of the cheesecake for a festive and colourful finish. You can arrange them in patterns or simply scatter them for a playful look.
Enjoy slicing into this decadent Easter Egg Cheesecake, a truly delightful treat for the holiday!
Conclusion:
This Easter Egg Cheesecake recipe is a guaranteed showstopper for your holiday celebrations! Its creamy, decadent texture combined with the festive crunch of chopped Easter eggs makes it a truly unique and delicious dessert. Whether you’re a seasoned baker or just looking to impress your family and friends, this recipe is surprisingly approachable and incredibly rewarding. The delightful swirl of colors and the rich cream cheese filling are sure to be a hit with both adults and children alike. Don’t be afraid to get creative with your decorations to make this Easter Egg Cheesecake your own!
For serving, I love to present it chilled, perhaps with a dollop of whipped cream or a few extra chocolate shavings. It’s also fantastic served alongside fresh berries, which add a lovely tartness to balance the sweetness. If you’re feeling adventurous, consider a chocolate ganache drizzle or even a sprinkle of edible glitter for extra sparkle.
Don’t hesitate to experiment with variations! You could incorporate different types of chocolate eggs, such as caramel-filled or mint-flavored, for a unique twist. A white chocolate cheesecake base would also be stunning. The possibilities are endless, and the joy of creating and sharing this Easter Egg Cheesecake is immense. I truly encourage you to give this recipe a try – it’s an unforgettable treat!
Frequently Asked Questions:
Q: How far in advance can I make this Easter Egg Cheesecake?
You can make the cheesecake up to 2 days in advance. It’s best to store it, covered, in the refrigerator. This allows the flavors to meld beautifully and the texture to set perfectly.
Q: What kind of Easter eggs work best?
Milk chocolate or semi-sweet chocolate Easter eggs tend to work best as they melt nicely and provide a good balance of sweetness. You can chop them into various sizes for different textural experiences throughout the cheesecake.
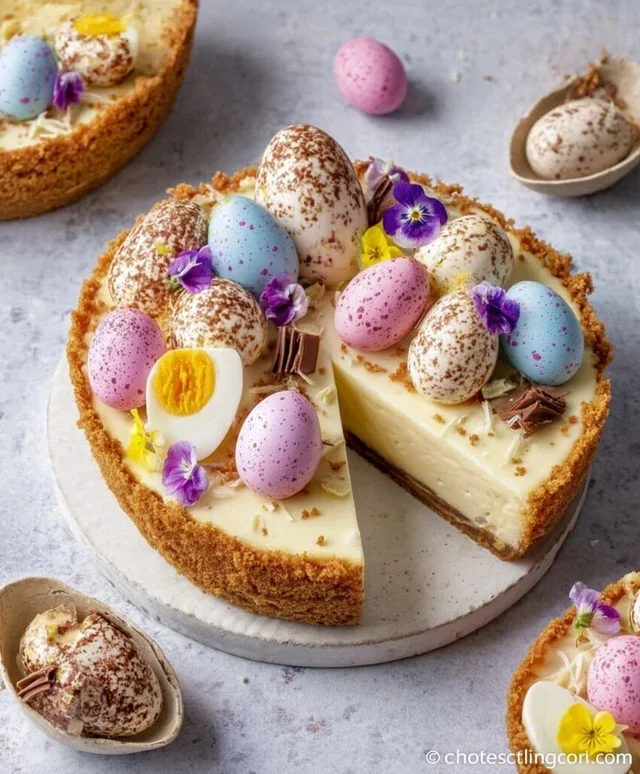
Easter Egg Cheesecake
A festive and decadent cheesecake featuring a chocolate egg-infused filling and a crunchy biscuit base, perfect for Easter celebrations.
Ingredients
-
2 hollow chocolate eggs (100 g Cadbury milk chocolate eggs)
-
75 g Graham cracker or digestive biscuits, crushed
-
30 g butter, melted
-
340 g cream cheese (full fat)
-
60 g powdered (confectioners’/icing) sugar
-
170 g heavy (double/whipping) cream
-
1 tsp vanilla extract
-
melted chocolate (for drizzling)
-
mini chocolate eggs (for garnish)
Instructions
-
Step 1
Gently melt the 2 hollow chocolate eggs in a heatproof bowl over a pan of simmering water, ensuring the bottom of the bowl doesn’t touch the water. Stir until smooth, then set aside to cool slightly. -
Step 2
Combine the crushed biscuits with the melted butter in a bowl. Press this mixture evenly into the base of a 7-inch springform pan to form the cookie base. -
Step 3
In a separate large bowl, beat the cream cheese and powdered sugar until smooth and creamy. Gradually beat in the melted chocolate until well combined. -
Step 4
In another bowl, whip the heavy cream and vanilla extract until stiff peaks form. Gently fold the whipped cream into the cream cheese and chocolate mixture until just combined. -
Step 5
Pour the cheesecake filling over the prepared biscuit base and smooth the top with a spatula. -
Step 6
Drizzle with melted chocolate and scatter mini chocolate eggs over the top for decoration. Chill the cheesecake in the refrigerator for at least 4 hours, or until firm.
Important Information
Nutrition Facts (Per Serving)
It is important to consider this information as approximate and not to use it as definitive health advice.
Allergy Information
Please check ingredients for potential allergens and consult a health professional if in doubt.