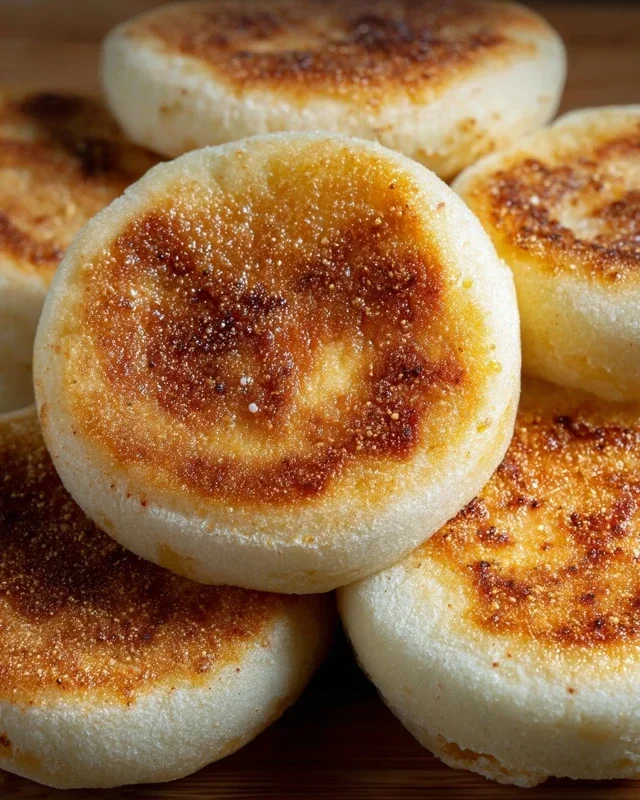
Easy Homemade English Muffins- Deliciously Simple Recipe
Easy Homemade English Muffins are an absolute game-changer for any breakfast lover. Forget those pre-packaged varieties that always seem a little too dense or surprisingly bland. There’s something incredibly satisfying about biting into a perfectly golden, tender English muffin, still warm from the skillet, with those signature nooks and crannies just beggin extractg to be slathered with butter or your favorite jam. I know I’ve always adored the rustic charm and delightful texture that only a truly homemade English muffin can deliver. The magic lies in their simplicity – a few basic pantry ingredients transformed into something truly special. They’re incredibly versatile, making them the ideal base for everything from a classic breakfast sandwich to a decadent Eggs Benedict. This recipe for easy homemade English muffins will have you ditching store-bought for good.
Easy Homemade English Muffins
There’s something undeniably special about a freshly made English muffin. Those nooks and crannies, perfect for soaking up butter and jam, are hard to replicate with store-bought versions. But guess what? Making them at home is surprisingly simple, and the aroma that fills your kitchen as they cook is a reward in itself. Forget the pre-packaged options and embrace the joy of creating these breakfast staples from scratch. This recipe is designed to be straightforward, perfect for begin extractners and seasoned bakers alike. Get ready to elevate your breakfast game with these delightfully chewy and flavorful homemade English muffins.
Ingredients:
Bringin extractg the Dough Together
Let’s start by activating our yeast. In a large bowl, combine the warm water and sugar. Give it a gentle stir to dissolve the sugar. Now, sprinkle the instant dry yeast over the surface of the water. Don’t stir it in just yet. Let it sit for about 5-10 minutes. You’ll know it’s alive and well if it becomes foamy and bubbly. This “proofing” step ensures your yeast is active and will help your muffins rise beautifully. If you don’t see any foam, your yeast might be old, and you’ll want to start over with fresh yeast. Once foamy, stir in the oil.
Next, it’s time for the flour and salt. Add 2 ¾ cups of all-purpose flour (or bread flour for a chewier texture) and the salt to the bowl. If you’re using kosher salt, which has larger flakes, you might want to add an extra small pinch to account for its lesser density compared to table salt. Stir everything together with a wooden spoon or a spatula until a shaggy dough starts to form. It will look quite sticky at this stage, and that’s perfectly normal.
Kneading and First Rise
Now, we move to the kneading process. You have a couple of options here. You can turn the dough out onto a lightly floured surface and knead by hand for about 8-10 minutes, or you can use a stand mixer fitted with a dough hook. If kneading by hand, start by gently pushing the dough away from you with the heel of your hand, then fold it back over itself. Rotate the dough a quarter turn and repeat. You’re looking for a smooth, elastic dough that springs back when gently poked. If the dough is too sticky to handle, add a tablespoon of flour at a time, just until it’s manageable but still a little tacky. Over-flouring will result in tough muffins.
Once your dough is kneaded, shape it into a ball and place it in a lightly oiled bowl. Turn the dough to coat it with the oil. Cover the bowl tightly with plastic wrap or a clean kitchen towel. Find a warm, draft-free spot for your dough to rise. This usually takes about 1 to 1.5 hours, or until the dough has doubled in size. The warmth of your oven (turned off!) or a sunny windowsill can be ideal. Don’t rush this step; a good rise is crucial for tender muffins.
Shaping and Second Rise
Once the dough has doubled, punch it down gently to release the air. Turn the dough out onto a lightly floured surface. Now, it’s time to shape our muffins! You can do this by gently patting the dough out to about ½ inch thick. Use a 3-inch round biscuit cutter or the rim of a glass to cut out your muffin shapes. Try not to twist the cutter; a straight down and up motion will help seal the edges. Re-roll the scraps once to cut out more muffins.
Arrange the cut-out dough rounds on a baking sheet or parchment paper. You can also lightly dust them with a bit more flour or cornmeal at this stage. Cover them loosely with plastic wrap or a clean kitchen towel again. Let them rest for another 20-30 minutes. This second, shorter rise will help them puff up before cooking.
Cooking the English Muffins
This is where the magic happens! Heat a large, lightly greased griddle or frying pan over medium-low heat. You want a consistent, gentle heat. Too high, and the outsides will burn before the insides cook. Sprinkle your griddle generously with cornmeal. This will give the muffins that authentic English muffin texture and prevent sticking.
Carefully place the risen dough rounds onto the prepared griddle, making sure not to overcrowd the pan. You should be able to cook 3-4 at a time, depending on the size of your pan. Cook for about 5-7 minutes per side. You’re looking for a beautiful golden brown color and a firm, cooked-through texture. You can gently press the sides to check for doneness. The internal temperature should be around 190-200°F (88-93°C) if you have a thermometer.
Cooling and Enjoying
Once cooked, remove the English muffins from the griddle and place them on a wire rack to cool slightly. Don’t be tempted to cut into them immediately! Allowing them to cool will help them firm up and make them easier to split. The best way to enjoy your homemade English muffins is to split them horizontally with a fork. This technique helps preserve those beloved nooks and crannies. Toast them lightly, spread with butter, jam, honey, or your favorite topping, and savor the incredible taste of your hard work. These are best enjoyed fresh, but you can store any leftovers in an airtight container at room temperature for a day or two, or freeze them for longer storage.

Conclusion:
I hope you’re as excited as I am to whip up a batch of these easy homemade English muffins! This recipe truly delivers on its promise: simple ingredients, straightforward steps, and incredibly delicious results that will make you wonder why you ever bought them from the store. The beautiful nooks and crannies are perfect for soaking up butter and jam, and the slightly chewy texture is simply irresistible. They are surprisingly versatile and a fantastic base for so many delicious meals. Don’t be intimidated; give this recipe a try. You’ll be amazed at how simple it is to create such a satisfying treat right in your own kitchen. I encourage you to embrace the joy of baking from scratch!
For serving, these are obviously divine toasted and slathered with butter and your favorite jam or marmalade. But don’t stop there! They make a fantastic base for breakfast sandwiches, topped with a fried egg, cheese, and beef bacon or sausage. They’re also wonderful as a base for Eggs Benedict or a quick savory tart with some cheese and herbs. For variations, consider adding a sprinkle of dried herbs like rosemary or chives to the dough for an herbaceous twist. You could also experiment with adding a touch of honey or a pinch of cinnamon for a slightly sweeter muffin. The possibilities are truly endless!
Frequently Asked Questions:
Why are my English muffins not developing nooks and crannies?
The key to those iconic nooks and crannies is a combination of factors. Ensure your dough is slightly sticky but not overly wet, and that you’re not overworking it. The cooking method is also crucial. Cooking on medium-low heat for a sufficient amount of time on each side allows the interior to steam and expand, creating those pockets. Don’t rush the process!
Can I make these ahead of time?
Absolutely! Once cooled, you can store your easy homemade English muffins in an airtight container at room temperature for 2-3 days, or freeze them for up to a month. Simply toast them directly from frozen for a quick and easy breakfast.
What if I don’t have a griddle?
No griddle, no problem! A heavy-bottomed skillet or even a baking sheet placed over a low burner can work. Just ensure the heat is as consistent as possible and adjust as needed to prevent burning.
Easy Homemade English Muffins
A simple recipe for delicious, fluffy homemade English muffins, perfect for breakfast or any meal.
Ingredients
-
1 ¼ cups warm water
-
1 tablespoon sugar
-
1 teaspoon instant dry yeast
-
2 tablespoon canola oil
-
2 ¾ cups all purpose flour
-
1 teaspoon salt
-
cornmeal for dusting
Instructions
-
Step 1
In a large bowl, combine the warm water, sugar, and instant dry yeast. Let stand for 5-10 minutes until foamy. -
Step 2
Stir in the oil. Gradually add the flour and salt, mixing until a shaggy dough forms. If the dough is too sticky, add up to 1/4 cup more flour. -
Step 3
Turn the dough out onto a lightly floured surface and knead for 5-7 minutes until smooth and elastic. -
Step 4
Place the dough in a lightly oiled bowl, cover, and let rise in a warm place for 1-1.5 hours, or until doubled in size. -
Step 5
Punch down the dough and turn it out onto a lightly floured surface. Roll or pat it to about 1/2 inch thickness. -
Step 6
Cut out rounds using a 3-inch biscuit cutter or a glass. Place the rounds on a baking sheet dusted with cornmeal. -
Step 7
Let the rounds rise, uncovered, for another 30-45 minutes. -
Step 8
Heat a lightly greased griddle or non-stick skillet over medium heat. Cook the English muffins for 4-6 minutes per side, until golden brown and cooked through.
Important Information
Nutrition Facts (Per Serving)
It is important to consider this information as approximate and not to use it as definitive health advice.
Allergy Information
Please check ingredients for potential allergens and consult a health professional if in doubt.