Best Classic Italian Tiramisu Recipe-Easy & Authentic
BEST Classic Italian Tiramisu Recipe: Ah, Tiramisu. Just the name conjures images of silky mascarpone, rich espresso-soaked ladyfingers, and a whisper of cocoa dust. If you’ve ever dreamt of mastering this iconic Italian dessert, you’ve come to the right place. There’s a reason why this dish has captivated palates across the globe for decades. It’s more than just a dessert; it’s an experience, a delightful dance of textures and flavors that’s both comforting and sophisticated. What truly makes our BEST Classic Italian Tiramisu Recipe stand out is its beautiful simplicity. We’re talking about pure, unadulterated indulgence, where every bite is a moment of pure bliss. Forget complicated steps; this recipe focuses on showcasing the inherent deliciousness of its core ingredients, ensuring you achieve that perfect balance of creamy, bitter, and sweet. Get ready to impress yourself and your loved ones with a truly authentic and unforgettable Tiramisu.”
BEST Classic Italian Tiramisu Recipe
There are desserts, and then there is Tiramisu. This iconic Italian treat, meaning “pick me up,” is a symphony of textures and flavors that can transport you straight to a bustling piazza in Rome or a charming trattoria in Florence. It’s a dessert that feels both elegant and comforting, perfect for a special occasion or simply to indulge your sweet tooth. While there are many variations, today we’re diving deep into the heart of what makes a truly classic Italian Tiramisu: the perfect balance of creamy mascarpone, rich coffee, delicate ladyfingers, and a whisper of cocoa.
Making authentic Tiramisu at home is surprisingly achievable, and incredibly rewarding. The key lies in using the best quality ingredients and following a few simple techniques. Forget the shortcuts and embrace the process – you’ll be rewarded with a dessert that’s far superior to any store-bought version. Let’s get started on creating your own masterpiece!
Ingredients:
Instructions
Phase 1: Preparing the Mascarpone Cream
1. The foundation of a perfect Tiramisu is its luscious, creamy filling. In a medium bowl, whisk together the 4 egg yolks and 2/3 cup of granulated sugar. You’re aiming for a pnon-alcoholic ale yellow, ribbon-like consistency. This process, known as “sabayon,” also gently cooks the egg yolks, making them safe to consume. Whisk vigorously for about 3-5 minutes, or until the mixture thickens and the sugar is fully dissolved. You should be able to lift the whisk and have the mixture fall back in thick ribbons that hold their shape for a moment. This step is crucial for a smooth and stable cream.
2. Now, it’s time for the star of the show: mascarpone cheese. Ensure your mascarpone is well-chilled, as this helps it maintain its structure. Add the 16 oz of cold mascarpone cheese to the egg yolk and sugar mixture. Gently fold the mascarpone into the egg mixture using a spatula. The key here is to fold, not whisk or beat, as overmixing can cause the mascarpone to break and become grainy or oily. Continue folding until the mixture is smooth and well-combined, with no streaks of cheese remaining. Add the 1 teaspoon of vanilla extract and 1/4 teaspoon of salt and gently fold them in. The vanilla adds a wonderful aroma and depth, while the salt balances the sweetness.
3. Next, we incorporate the air that makes our Tiramisu so delightfully light and airy. If you are using heavy cream: In a separate, clean bowl, whip the 1 1/2 cups of chilled heavy cream until stiff peaks form. Be careful not to over-whip, or you’ll end up with butter! Once the cream is whipped to perfection, gently fold it into the mascarpone mixture in two additions. Again, use a spatula and a gentle folding motion, as if you’re trying to lift the mixture from the bottom and fold it over the top. This preserves the airiness of the whipped cream and prevents the mascarpone from becoming too dense.
If you are using egg whites: In a separate, very clean bowl (any trace of grease will prevent the whites from whipping), whip the 4 egg whites until soft peaks form. Gradually add 1/3 cup of the sugar, continuing to whip until stiff, glossy peaks form. Then, gently fold the whipped egg whites into the mascarpone mixture in two additions, using the same gentle folding technique described above. This method requires more care but results in an incredibly light and traditional Tiramisu.
Phase 2: Assembling the Tiramisu
4. Prepare your coffee. Brew 1 1/2 cups of strong black coffee and let it cool to room temperature. It’s important that the coffee is not hot, as it can make the ladyfingers too mushy and melt the mascarpone cream. Some people like to add a tablespoon or two of coffee liqueur extract, such as Kahlúa or Tia Maria, to the coffee for an extra layer of flavor, but it’s entirely optional for a classic, non-alcoholic alternative-free version. Pour the coffee into a shallow dish, wide enough to dip the ladyfingers.
5. Now, it’s assembly time! This is where all your hard work comes together. Take your 30-36 ladyfingers and, one by one, quickly dip each side into the cooled coffee. Be swift – you only want to wet the ladyfingers, not soak them until they fall apart. They should absorb enough liquid to be moist but still hold their shape. Arrange a single layer of these coffee-dipped ladyfingers in the bottom of your serving dish. You can break some ladyfingers to fit if needed, ensuring an even layer.
6. Spread half of the prepared mascarpone cream evenly over the layer of ladyfingers. Use your spatula to gently spread it, ensuring it reaches all the corners of the dish. Don’t worry if it’s not perfectly smooth; a rustic look is part of its charm.
7. Repeat the dipping and layering process with another layer of coffee-dipped ladyfingers. Place them snugly on top of the first cream layer.
8. Finally, spread the remaining half of the mascarpone cream over the second layer of ladyfingers. Smooth the top as best as you can, creating a clean canvas for the final flourish.
Phase 3: Chilling and Serving
9. The most challengin extractg part: patience! Cover the dish tightly with plastic wrap and refrigerate for at least 4-6 hours, or preferably overnight. This chilling period is absolutely essential. It allows the flavors to meld and deepen, and the ladyfingers to soften and absorb more of the cream, creating that signature dense yet airy texture. If you try to serve it too soon, it will be too loose and the flavors won’t have had a chance to harmonize.
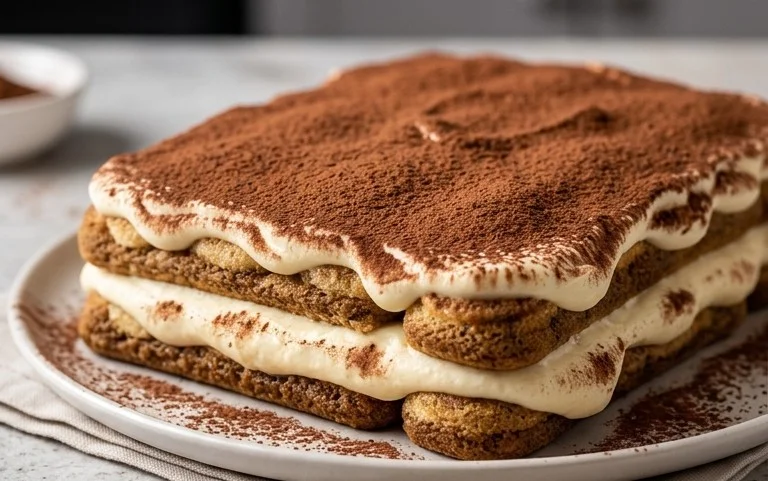
10. Just before serving, dust the top of your Tiramisu generously with 2 tablespoons of cocoa powder using a fine-mesh sieve. This creates that beautiful, classic finish and adds a subtle bitter contrast to the sweet cream. Slice and serve chilled. Enjoy every single “pick me up” bite!

Conclusion:
You’ve now got everything you need to create the BEST Classic Italian Tiramisu Recipe! This recipe truly shines because it balances the rich, creamy mascarpone with the slightly bitter coffee and the delicate soak of ladyfingers. It’s a dessert that feels both sophisticated and comforting, a perfect ending to any meal. I love serving it chilled, allowing the flavors to meld beautifully. For an extra touch, a dusting of cocoa powder right before serving is a must, and I sometimes add a splash of Marsala grape juice to the coffee for an authentic Italian twist.
Don’t be afraid to experiment! You can try different liqueur extracts like rum extract or amaretto extract, or even add a layer of fresh berries for a fruity contrast. The beauty of this classic dessert is its adaptability. So, dive in, gather your ingredients, and prepare to impress yourself and your loved ones. I guarantee you’ll be delighted with the results. Happy baking!
Frequently Asked Questions:
Can I make this Tiramisu ahead of time?
Absolutely! In fact, Tiramisu is best when made at least 6-8 hours ahead, or even the day before. This allows the ladyfingers to fully absorb the coffee mixture and the flavors to meld together into a harmonious symphony.
What kind of coffee should I use?
A strong brewed coffee or espresso is ideal. It needs to be robust enough to stand up to the sweetness of the mascarpone and provide a pleasant contrast. Avoid using weak or flavored coffee, as it can dilute the classic Tiramisu taste.
My mascarpone mixture is too thin. What did I do wrong?
This usually happens if the mascarpone is overmixed or if it’s too warm. Ensure your mascarpone is at room temperature but not melted. Gently fold it into the egg mixture rather than aggressively beating it. If it’s still a bit thin, chilling it in the refrigerator for a while can help it firm up.
BEST Classic Italian Tiramisu Recipe
A timeless and authentic Italian Tiramisu recipe, made with rich mascarpone, coffee-soaked ladyfingers, and a delicate dusting of cocoa.
Ingredients
-
16 oz Mascarpone cheese, cold from the fridge
-
4 egg yolks
-
2/3 cup granulated or caster sugar
-
1 tsp vanilla extract
-
1/4 tsp salt
-
1 1/2 cup heavy cream, chilled
-
30-36 ladyfingers
-
1 1/2 cup strong black coffee, room temperature
-
2 tbsp cocoa powder to dust
Instructions
-
Step 1
In a large bowl, whisk together the egg yolks, granulated sugar, vanilla extract, and salt until pale and creamy. -
Step 2
In a separate bowl, whip the heavy cream until stiff peaks form. Gently fold the whipped cream into the egg yolk mixture until just combined. If using egg whites, whip them to stiff peaks and fold into the yolk mixture. Take care not to overmix. -
Step 3
Quickly dip each ladyfinger into the room temperature coffee. Do not over-soak, or they will become mushy. -
Step 4
Arrange a single layer of coffee-dipped ladyfingers in the bottom of a serving dish. Spread half of the mascarpone cream mixture evenly over the ladyfingers. -
Step 5
Repeat with another layer of coffee-dipped ladyfingers and the remaining mascarpone cream mixture. -
Step 6
Cover the dish and refrigerate for at least 4 hours, or preferably overnight, to allow the flavors to meld and the tiramisu to set. -
Step 7
Just before serving, dust the top generously with cocoa powder.
Important Information
Nutrition Facts (Per Serving)
It is important to consider this information as approximate and not to use it as definitive health advice.
Allergy Information
Please check ingredients for potential allergens and consult a health professional if in doubt.