Easy Chocolate Swiss Roll Recipe-Quick & Delicious Dessert
Easy Chocolate Swiss Roll recipes are a gateway to pure dessert bliss, don’t you agree? There’s something undeniably magical about a fluffy, chocolate-kissed sponge cake rolled around a luscious filling, creating a treat that’s as beautiful as it is delicious. We all love a good dessert, but the easy chocolate Swiss roll holds a special place in many hearts. It conjures up images of cozy afternoons, celebratory moments, and the sheer joy of sharing something homemade. What makes this particular dessert so universally adored? It’s the perfect balance: the delicate lightness of the sponge contrasting with the rich cream, all without the fuss often associated with more complex cakes. This easy chocolate Swiss roll is proof that impressive desserts don’t need to be complicated. Get ready to impress yourself and your loved ones with this deceptively simple, utterly delightful creation.
Easy Chocolate Swiss Roll
There’s something undeniably magical about a Swiss roll. That swirl of fluffy cake and creamy filling, all rolled up into a beautiful log, feels like a special occasion. But often, making one can seem a little intimidating, especially for those avoiding gluten or dairy. Fear not! I’ve developed a recipe for an incredibly easy and delicious Chocolate Swiss Roll that’s both gluten-free and dairy-free, proving that delightful treats don’t need to be complicated. This recipe uses simple, wholesome ingredients to create a showstopper that’s perfect for birthdays, holidays, or just a cozy afternoon treat. The secret to its lightness and delicate texture lies in the aquafaba, the magical liquid from a can of chickpeas, which whips up like egg whites. Let’s get baking!
Ingredients:
For the Chocolate Cake:
This cake is surprisingly simple and comes together quickly. The combination of oat flour and cassava flour creates a lovely tender crum extractb, while the cocoa powder delivers a rich chocolate flavor.
1. Preheat and Prepare: First things first, preheat your oven to 175°C (350°F). Line a 25cm x 35cm (10” x 14”) jelly roll pan with parchment paper, leaving an overhang on the sides to help you lift the cake out easily later. Lightly grease the parchment paper as well. This ensures your delicate cake doesn’t stick.
2. Mix the Dry Ingredients: In a medium bowl, whisk together the oat flour, cassava flour, 30g of cocoa powder, arrowroot starch, baking powder, and baking soda. It’s important to whisk these well to ensure the leavening agents are evenly distributed, which will give your cake a nice, even rise.
3. Whip the Aquafaba: In a large, clean bowl (make sure it’s grease-free, as any oil can prevent the aquafaba from whipping properly), begin extract whipping the aquafaba with an electric mixer on medium speed. Once it starts to get foamy, gradually add 100g of the granulated sugar (or coconut sugar). Continue whipping until you achieve stiff, glossy peaks, similar to meringue. This process can take about 5-7 minutes. Don’t rush this step; the airy aquafaba is crucial for the cake’s lightness.
4. Combine Wet and Dry: In a separate bowl, whisk together the unsweetened applesauce and unsweetened dairy-free yogurt. Gently fold this wet mixture into the whipped aquafaba mixture. Be careful not to deflate the aquafaba too much; you want to keep as much air in as possible. Next, gently fold in the dry ingredients from step 2. Fold until just combined; overmixing can make the cake tough.
5. Bake the Cake: Pour the batter evenly into the prepared jelly roll pan. Spread it out gently with a spatula to ensure an even layer. Bake for 12-15 minutes, or until a toothpick inserted into the center comes out clean and the cake springs back lightly when touched. The cake should be golden brown around the edges but still soft in the center.
6. Cool and Roll: While the cake is baking, lay a clean, lint-free kitchen towel on your counter and generously dust it with the 2 tbsp of cocoa powder. This prevents the cake from sticking to the towel and adds a subtle visual appeal. As soon as the cake is out of the oven, carefully invert it onto the prepared cocoa-dusted towel. Peel off the parchment paper carefully. Starting from one of the shorter ends, tightly roll up the warm cake and towel together. Let it cool completely in this rolled-up state. This chilling process helps set the shape and prevents cracking when you unroll it later to fill.
For the Chocolate Frosting and Assembly:
This frosting is luxuriously rich and dairy-free. The freeze-dried strawberries add a beautiful color and a concentrated berry flavor.
1. Prepare the Frosting Base: In a large bowl, beat the room temperature vegan butter until creamy and smooth.
2. Add Sweetness and Flavor: Gradually beat in the remaining 100g of granulated sugar (or coconut sugar) until well combined. Add the pulsed freeze-dried strawberry flour. Beat until the frosting is light and fluffy.
3. Make the Creamy Frosting: In a separate small bowl, gently whisk together the coconut fat (scooped from the top of the chilled coconut cream can – you want the thick part, not the liquid) and a tablespoon or two of the frosting until smooth. Then, gradually add this to the main frosting mixture, beating until it’s smooth and spreadable. This addition of coconut fat helps create a firmer, more stable frosting perfect for rolling.
4. Unroll and Fill: Once the cake is completely cool, carefully unroll it. Spread the chocolate frosting evenly over the surface of the cake, leaving a small border around the edges.
5. Roll it Up: Starting from the same end you began rolling before, tightly roll the cake up again, this time without the towel. You might need to gently guide it. Place the Swiss roll, seam-side down, on a serving plate.
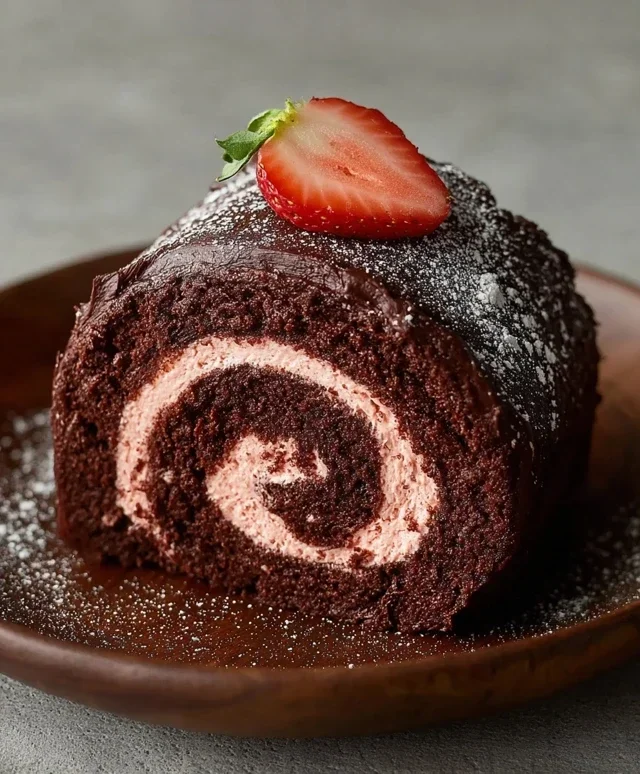
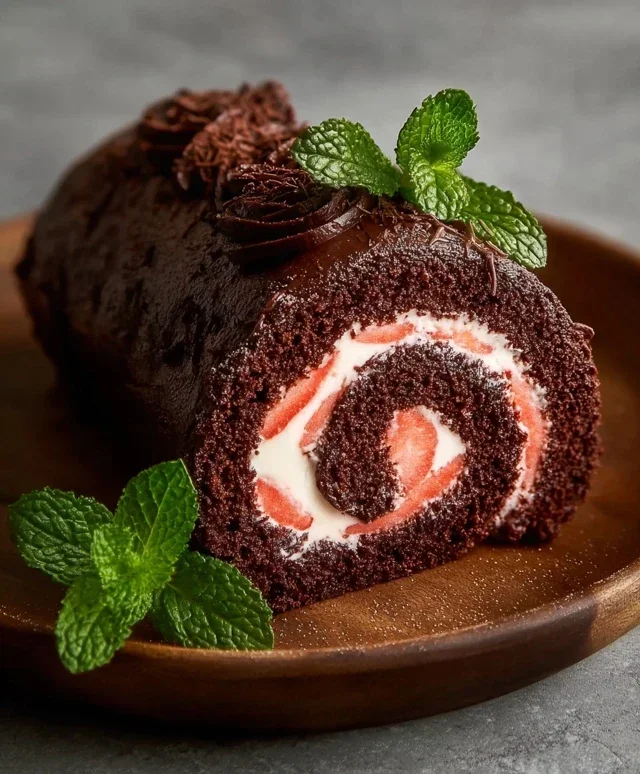
6. Decorate and Serve: You can frost the outside of the roll with any remaining frosting if desired, or simply dust with a little more cocoa powder. Garnish with the sliced strawberries. For an extra touch, you can drizzle some melted vegan chocolate over the top. Slice and enjoy your homemade masterpiece!
Conclusion:
And there you have it! I hope you’re as excited as I am to whip up this Easy Chocolate Swiss Roll. It truly is a showstopper that’s surprisingly simple to make, proving that elegant desserts don’t have to be complicated. The light and airy sponge cake, combined with a rich chocolate filling, creates a delightful contrast in textures and flavors that’s perfect for any occasion, from a casual afternoon treat to a more formal gathering. Don’t be intimidated by the rolling process; it’s part of the fun and the beauty of a Swiss roll!
Serve your finished Swiss roll chilled, dusted with a little powdered sugar, or with a dollop of fresh whipped cream and some berries for an extra touch of decadence. For variations, consider adding a hint of espresso powder to the cake batter for a mocha twist, or incorporating a splash of liqueur extract into your chocolate filling. You could also try a cream cheese frosting as an alternative to the chocolate ganache. I wholeheartedly encourage you to give this recipe a try. It’s incredibly rewarding to create something so beautiful and delicious from scratch!
Frequently Asked Questions:
Why did my Swiss roll crack when I rolled it?
Cracking often happens if the cake is rolled too tightly, or if it’s been overbaked and has become dry. Ensure you’re rolling it while it’s still warm and pliable, and try not to overbake. If a few small cracks appear, don’t worry; they’ll be mostly hidden once filled and dusted with powdered sugar.
Can I make the chocolate filling ahead of time?
Absolutely! Most chocolate ganache fillings can be made a day or two in advance and stored in the refrigerator. You might need to let it soften slightly at room temperature before spreading it onto the cake for easier application.
What kind of chocolate should I use for the ganache?
Using good quality semi-sweet or dark chocolate will give you the best flavor for your ganache. Avoid using chocolate chips as they often contain stabilizers that can affect the texture of the ganache.
Easy Chocolate Swiss Roll
A simple and delicious dairy-free and gluten-free chocolate Swiss roll made with oat flour and aquafaba.
Ingredients
-
135 g oat flour
-
30 g cassava flour
-
30 g cocoa powder
-
1 tbsp arrowroot starch
-
1 1/2 tsp baking powder
-
1/2 tsp baking soda
-
122 mL aquafaba, room temperature
-
200 g organic granulated sugar or coconut sugar, divided
-
100 g unsweetened applesauce, room temperature
-
60 g unsweetened dairy free yogurt, room temperature
-
2 tbsp cocoa powder for dusting the dish towel
-
1 cup sliced strawberries, for garnish
-
226 g vegan butter, room temperature
-
70 g freeze dried strawberries, pulsed into a flour
-
Coconut fat from 1 can full-fat coconut cream
Instructions
-
Step 1
Preheat oven to 350°F (175°C). Line a 10×15 inch jelly roll pan with parchment paper and grease lightly. Dust with 2 tbsp cocoa powder. -
Step 2
In a large bowl, whisk together oat flour, cassava flour, 30g cocoa powder, arrowroot starch, baking powder, and baking soda. -
Step 3
In a separate bowl, beat aquafaba until foamy. Gradually add 100g of the sugar and continue beating until stiff peaks form, like meringue. -
Step 4
Gently fold the applesauce and dairy-free yogurt into the dry ingredients until just combined. Then, carefully fold the aquafaba mixture into the batter in two additions until no streaks remain. -
Step 5
Pour the batter into the prepared pan and spread evenly. Bake for 12-15 minutes, or until a toothpick inserted into the center comes out clean. -
Step 6
While the cake bakes, place a clean dish towel on a flat surface and dust it generously with cocoa powder. Invert the baked cake onto the prepared towel and carefully peel off the parchment paper. -
Step 7
Starting from the short end, carefully roll up the cake and towel together. Let it cool completely. -
Step 8
For the filling, beat vegan butter, remaining 100g sugar, and coconut fat until light and fluffy. Stir in pulsed freeze-dried strawberries. -
Step 9
Once cooled, gently unroll the cake. Spread the filling evenly over the cake, leaving a small border. Re-roll the cake, this time without the towel. -
Step 10
Chill the Swiss roll for at least 30 minutes before slicing and serving. Garnish with sliced strawberries if desired.
Important Information
Nutrition Facts (Per Serving)
It is important to consider this information as approximate and not to use it as definitive health advice.
Allergy Information
Please check ingredients for potential allergens and consult a health professional if in doubt.