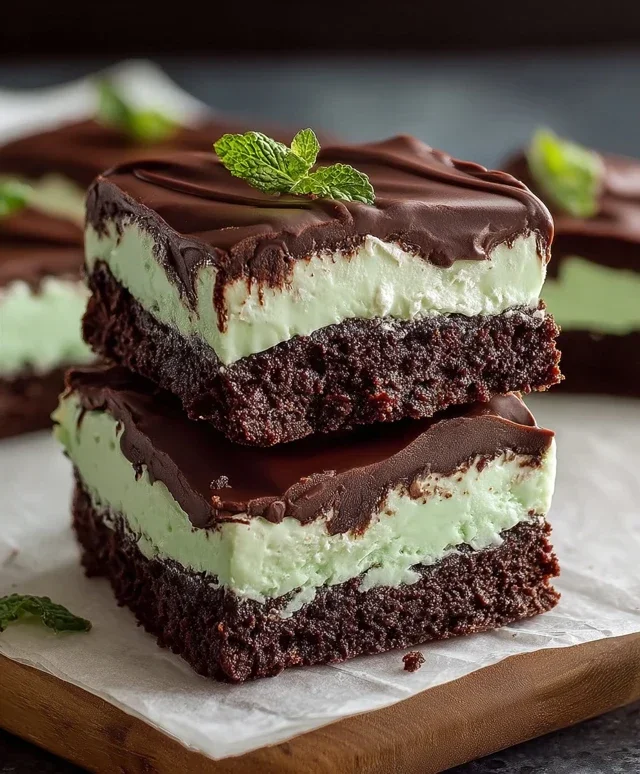
Decadent Triple-Layer Chocolate Mint Squares – Easy Recipe
Triple-layer chocolate mint squares are a dream come true for any dessert enthusiast. If you’re like me, the mere thought of rich chocolate and refreshing mint combined in a decadent, multi-layered treat sends shivers of anticnon-alcoholic ipation down your spine. These aren’t just any brownies; they’re an experience. The magic of triple-layer chocolate mint squares lies in their irresistible texture and harmonious flavor profile. Imagin extracte a crum extractbly, buttery chocolate base, topped with a creamy, cool mint layer, all crowned with a luscious chocolate ganache. It’s a symphony of sweetness and coolness that perfectly balances richness without being overwhelming. This dessert is guaranteed to impress at any gathering, or simply be your personal indulgence for a quiet evening in. Get ready to create your own little piece of chocolate mint heaven.
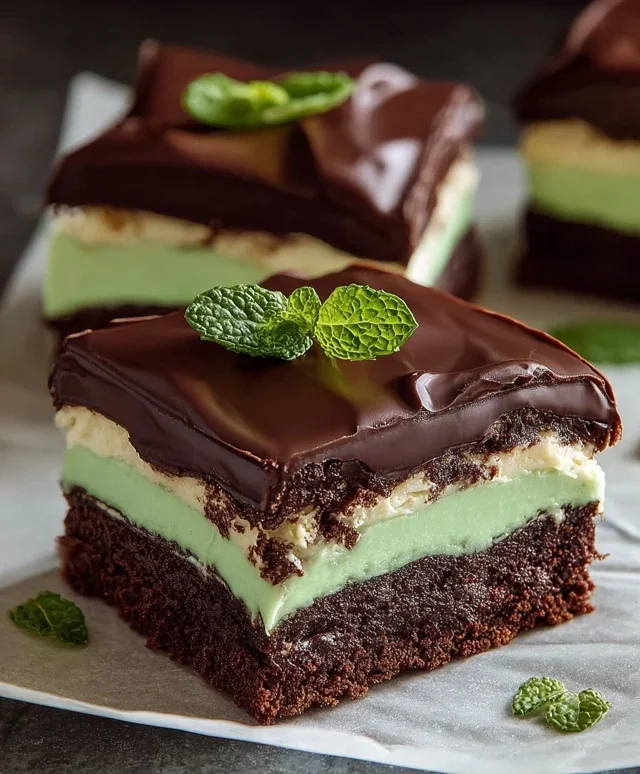
Triple-Layer Chocolate Mint Squares
Get ready to impress yourself and everyone you know with these decadent Triple-Layer Chocolate Mint Squares! This recipe delivers a stunning dessert with three distinct layers of rich chocolatey goodness and a refreshing minty kick. It might sound complicated, but I promise, with a little patience and clear instructions, you’ll be whipping up these crowd-pleasers in no time. They are perfect for holidays, celebrations, or just when you need a serious chocolate fix.
Ingredients:
Instructions:
The Rich Chocolate Base
1. Begin extract by preheating your oven to 350°F (175°C). Grease and flour a 9×13 inch baking pan, or line it with parchment paper, leaving an overhang on the sides to easily lift the finished dessert out later. This will be the foundation of our glorious triple-layer creation. In a medium saucepan over low heat, melt 1 cup of salted butter and 4 oz. of semi-sweet chocolate chips. Stir them together until they are completely smooth and combined. Be patient here; you don’t want to scorch the chocolate. Once melted and smooth, remove the saucepan from the heat and set it aside to cool slightly.
2. In a large mixing bowl, combine 2 cups of granulated sugar with the slightly cooled chocolate and butter mixture. Add 2 teaspoons of vanilla extract to this bowl. Next, gradually beat in the 4 large eggs, one at a time, ensuring each egg is fully incorporated before adding the next. This gradual addition helps create a smoother, emulsified batter. Finally, sift in 1 ½ cups of all-purpose flour. Gently fold the flour into the wet ingredients until just combined. Be careful not to overmix, as this can lead to a tough base. Pour this rich chocolate batter into your prepared baking pan and spread it evenly. Bake for 25-30 minutes, or until a toothpick inserted into the center comes out with moist crum extractbs attached. Allow this chocolate base to cool completely in the pan on a wire rack. This is crucial for the subsequent layers to set properly.
The Creamy Mint Frosting
3. While the chocolate base is cooling, let’s prepare the vibrant green mint frosting. In a large mixing bowl, cream together ¾ cup of softened salted butter and 3 cups of powdered sugar. Start on low speed to avoid a sugar cloud, then gradually increase the speed until the mixture is light and fluffy. This process might take a few minutes. If your butter is too cold, the frosting can be lumpy, so ensure it’s at room temperature. Once the butter and sugar are well combined, add 1 tablespoon of heavy whipping cream and 1 teaspoon of peppermint extract. Mix until smooth and creamy. Now for the fun part: add 10 drops of green food coloring, a few drops at a time, until you achieve your desired vibrant minty green hue. Beat until the color is uniformly distributed. Taste a tiny bit to ensure the peppermint flavor is to your liking. If you want it stronger, add another ½ teaspoon of peppermint extract.
4. Once the chocolate base has cooled entirely, spread the creamy mint frosting evenly over the top. Use an offset spatula or the back of a spoon to get a smooth, even layer. This layer should be generous and decadent. Place the pan in the refrigerator for at least 30 minutes to allow the mint frosting to firm up. This step is essential to prevent the top chocolate layer from melting into the frosting and creating a messy situation. A firm frosting layer will make the next step much easier and cleaner.
The Silky Chocolate Ganache Topping
5. For the final, luxurious topping, we’re making a simple yet elegant chocolate ganache. In a heatproof bowl, combine 3 cups of semi-sweet chocolate chips with 2 tablespoons of butter. In a small saucepan, heat ½ cup of heavy whipping cream over medium heat until it just begin extracts to simmer around the edges. Do not let it boil vigorously. Pour the hot cream over the chocolate chips and butter. Let it sit for about 5 minutes, allowing the heat from the cream to melt the chocolate. After 5 minutes, whisk the mixture gently, starting from the center and working your way outwards, until it is completely smooth, glossy, and homogenous. This is your ganache.
6. Once the mint frosting has firmed up in the refrigerator, carefully pour the warm (not hot) chocolate ganache over the top. Gently spread it evenly with an offset spatula or by tilting the pan slightly. Try to get a smooth, even surface. Place the entire pan back into the refrigerator for at least 1 hour, or until the ganache is set. This final chilling period is crucial for allowing all the layers to meld together and for the ganache to harden so you can get clean cuts.
Once set, use the parchment paper overhang to lift the entire dessert out of the pan. Cut into squares using a sharp knife, wiping the knife clean between cuts for the neatest results. Enjoy these delightful Triple-Layer Chocolate Mint Squares!
Conclusion:
There you have it – your guide to crafting these absolutely decadent triple-layer chocolate mint squares! These treats are a guaranteed showstopper, perfectly balancing rich chocolate, refreshing mint, and a satisfying crunch. They’re incredibly versatile, making them ideal for special occasions, a delightful afternoon pick-me-up, or even as a homemade gift that’s sure to impress. I truly encourage you to give this recipe a try; the process is rewarding, and the result is simply divine.
For serving, consider dusting them with a little cocoa powder or a drizzle of white chocolate for an extra touch of elegance. They pair wonderfully with a strong cup of coffee or a cold glass of milk. Looking for ways to switch things up? Try adding a sprinkle of chocolate chips to the cookie base for even more chocolatey goodness, or experiment with different extracts like peppermint for a more intense mint flavor. You could even add a layer of crushed Oreos for a delightful textural contrast.
Frequently Asked Questions:
Can I make these triple-layer chocolate mint squares ahead of time?
Absolutely! These squares are fantastic for making in advance. In fact, the flavors often meld and deepen beautifully after a day or two in the refrigerator. Store them in an airtight container at room temperature for up to 3 days, or in the refrigerator for up to a week. Just be sure to let them come to room temperature slightly before serving for the best texture.
What kind of chocolate should I use for the best flavor?
For the most intense and satisfying chocolate flavor in your triple-layer chocolate mint squares, I recommend using good quality semi-sweet or dark chocolate. A brand you enjoy eating on its own will translate into a superior dessert. Avoid using chocolate chips if possible, as they often contain stabilizers that can affect the melting and setting properties.
Can I substitute the mint extract?
While mint extract is the classic choice, you can certainly experiment! Peppermint extract will give you a stronger, more traditional mint flavor. You could also try a small amount of spearmint extract for a milder, slightly sweeter mintiness. Just be mindful that extracts are potent, so start with the recommended amount and adjust to your preference.
Triple-Layer Chocolate Mint Squares
Decadent triple-layer chocolate mint squares featuring a rich chocolate base, creamy mint filling, and a smooth chocolate ganache topping.
Ingredients
-
1 cup salted butter, melted
-
4 oz. semi-sweet chocolate chips
-
2 cups granulated sugar
-
2 teaspoons vanilla extract
-
1 ½ cups all-purpose flour
-
4 large eggs
-
¾ cup salted butter, softened
-
3 cups powdered sugar
-
1 tablespoon heavy whipping cream
-
1 teaspoon peppermint extract
-
10 drops green food coloring
-
3 cups semi-sweet chocolate chips
-
2 tablespoons butter
-
½ cup heavy whipping cream
Instructions
-
Step 1
Preheat oven to 350°F (175°C). Grease and flour a 9×13 inch baking pan. -
Step 2
For the base: Melt 1 cup salted butter and 4 oz. semi-sweet chocolate chips together. Stir in 2 cups granulated sugar and 2 teaspoons vanilla extract. Add 1 ½ cups all-purpose flour and 4 large eggs, mixing until just combined. Pour into the prepared pan and bake for 20-25 minutes. -
Step 3
For the mint layer: In a large bowl, cream together ¾ cup softened salted butter, 3 cups powdered sugar, 1 tablespoon heavy whipping cream, and 1 teaspoon peppermint extract until smooth. Stir in 10 drops green food coloring. Spread evenly over the baked chocolate base. -
Step 4
For the ganache topping: In a microwave-safe bowl, combine 3 cups semi-sweet chocolate chips and 2 tablespoons butter. Microwave in 30-second intervals, stirring in between, until smooth. Stir in ½ cup heavy whipping cream until fully incorporated. Pour the ganache over the mint layer. -
Step 5
Chill in the refrigerator for at least 30 minutes before cutting into squares.
Important Information
Nutrition Facts (Per Serving)
It is important to consider this information as approximate and not to use it as definitive health advice.
Allergy Information
Please check ingredients for potential allergens and consult a health professional if in doubt.