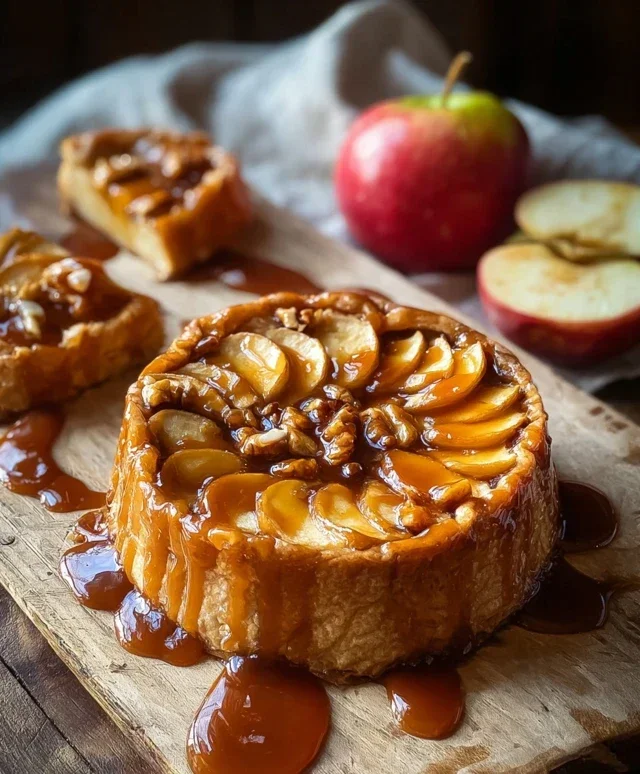
Easy Apple Pie Bars- Delicious Dessert Treat
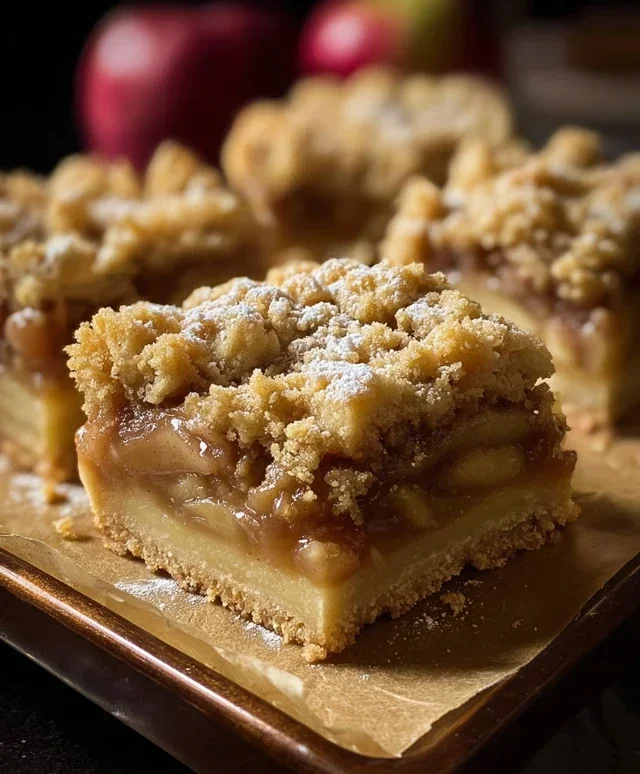
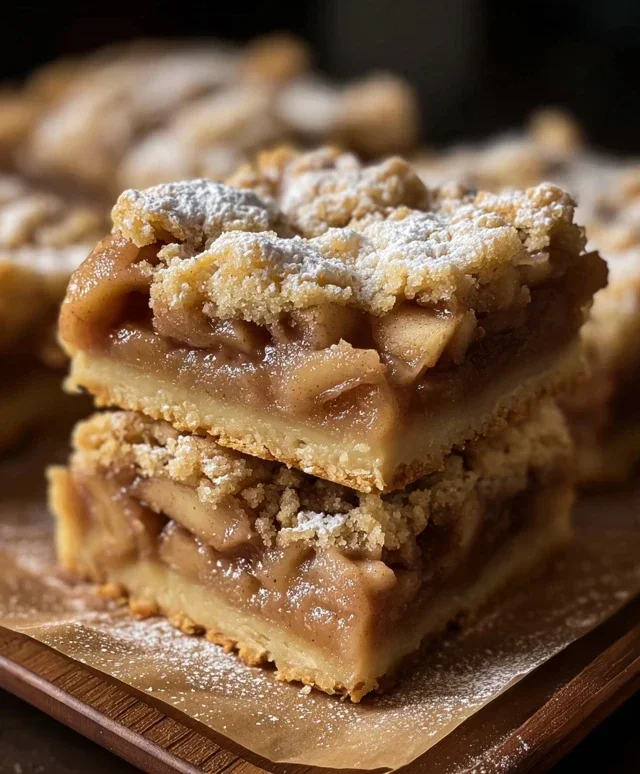
Apple Pie Bars are a revelation, a delightful twist on a classic that brings all the cozy, comforting flavors of Grandma’s apple pie into a perfectly portable and incredibly easy-to-make bar. We all adore apple pie, right? That sweet, spiced apple filling nestled in a flaky crust is pure autumnal bliss. But let’s be honest, sometimes rolling out pie dough can be a bit… daunting. That’s where these wonderful Apple Pie Bars swoop in to save the day! They deliver that unmistakable taste of warm, baked apples and cinnamon, but with a crum extractbly, buttery crust and topping that’s so much simpler to assemble. Imagin extracte: no fussy crimping, no tricky lattice work, just pure, unadulterated apple pie goodness in every single bite. These bars are perfect for potlucks, bake snon-alcoholic ales, or simply a weeknight treat that feels like a special occasion.
Why You’ll Love These Apple Pie Bars
The Ultimate Comfort Food, Simplified
Apple Pie Bars
There’s something undeniably comforting about apple pie. The warm, spiced apples nestled in a flaky crust – it’s a classic for a reason. But sometimes, a whole pie feels like a commitment, or maybe you just want something a little more portable and less fussy to serve. That’s where these Apple Pie Bars come in! They deliver all the beloved flavors of apple pie in a convenient, bar form. The buttery, shortbread-like crust provides the perfect foundation for a sweet and tangy apple filling, all infused with that quintessential cinnamon spice. They’re perfect for picnics, potlucks, or just a cozy afternoon treat. I love how easily they come together, and the aroma that fills the kitchen while they bake is simply divine.
Ingredients:
Creating the Crust
The base of our Apple Pie Bars is a simple yet incredibly delicious shortbread-style crust. It’s made with basic pantry staples and comes together quickly. The key here is to use cold butter, which helps create those desirable tender and slightly crum extractbly textures.
Preparing the Apple Filling
While the crust is chilling or just before you assemble, let’s get our star ingredient ready – the apples! A good mix of apples can offer a nice balance of sweet and tart flavors, but feel free to use your favorite baking apples.
Assembling and Baking
Now for the fun part – bringin extractg it all together! This is where the magic happens and your kitchen starts to smell absolutely heavenly.
Conclusion:
I hope you’re as excited as I am about these delicious Apple Pie Bars! They truly offer the comforting taste of classic apple pie in a convenient, portable bar form. The perfect balance of sweet, spiced apples nestled in a buttery, crum extractbly crust makes them an absolute winner for any occasion. Whether you’re looking for a delightful dessert for a family gathering, a tasty treat to share with friends, or just a little something sweet to enjoy with your afternoon tea, these Apple Pie Bars are sure to impress. Their simplicity in preparation means you can whip up a batch without much fuss, and the results are consistently delightful.
I love serving these warm with a scoop of vanilla ice cream – it’s pure bliss! They are also fantastic on their own, or drizzled with a simple caramel sauce. Don’t be afraid to get creative with variations! You could add a handful of chopped walnuts or pecans to the apple filling for extra crunch, or even a sprinkle of cinnamon sugar over the top before baking for an extra layer of sweetness and spice. I truly encourage you to give these Apple Pie Bars a try; I’m confident they’ll become a new favorite in your recipe repertoire.
Frequently Asked Questions:
Can I make these Apple Pie Bars ahead of time?
Absolutely! These bars are excellent for making ahead. You can bake them completely, let them cool, and store them in an airtight container at room temperature for up to 3 days, or in the refrigerator for up to a week. Reheating them gently in a low oven or microwave can bring back that fresh-baked warmth.
What kind of apples are best for this recipe?
For the best flavor and texture, I recommend using a mix of apples. Tart varieties like Granny Smith hold their shape well and provide a lovely contrast to the sweetness, while sweeter apples like Honeycrisp or Fuji add depth of flavor. Using a combination ensures a wonderfully complex and delicious apple pie bar.
Apple Pie Bars
Delicious and easy apple pie bars with a buttery crust and sweet apple filling.
Ingredients
-
2½ cups all-purpose flour
-
1 cup granulated sugar
-
1 tsp baking powder
-
½ tsp salt
-
1 cup (2 sticks) cold unsalted butter, cubed
-
1 egg
-
1 tsp vanilla extract
-
4 cups peeled & diced apples
-
2 tbsp lemon juice
-
½ cup brown sugar
-
2 tsp cinnamon
-
1 tsp cornstarch
Instructions
-
Step 1
Preheat oven to 375°F (190°C). Line a 9×13 inch baking pan with parchment paper, leaving an overhang. -
Step 2
In a large bowl, whisk together flour, granulated sugar, baking powder, and salt for the crust. Cut in cold butter until the mixture resembles coarse crumbs. -
Step 3
In a separate small bowl, whisk together the egg and vanilla extract. Add to the flour mixture and mix until just combined to form a dough. Press 2/3 of the dough evenly into the bottom of the prepared baking pan. -
Step 4
In a medium bowl, toss the diced apples with lemon juice. In a small bowl, combine brown sugar, cinnamon, and cornstarch. Add this mixture to the apples and toss to coat. -
Step 5
Spread the apple mixture evenly over the pressed dough in the baking pan. -
Step 6
Crumble the remaining 1/3 of the dough over the apple layer. -
Step 7
Bake for 30-35 minutes, or until the topping is golden brown and the apple filling is bubbly. -
Step 8
Let cool completely in the pan before cutting into bars.
Important Information
Nutrition Facts (Per Serving)
It is important to consider this information as approximate and not to use it as definitive health advice.
Allergy Information
Please check ingredients for potential allergens and consult a health professional if in doubt.