Easy Japanese Tuna Onigiri Quick Recipe
15-min. Easy Japanese Tuna Onigiri are your new best friend when hunger strikes! Are you looking for a quick, satisfying, and incredibly delicious meal that can be whipped up in mere minutes? Then look no further. These delightful rice balls, a staple of Japanese bento boxes and convenient snacks, are universally loved for their simplicity and versatility. What makes Japanese Tuna Onigiri so special? It’s the perfect marriage of fluffy, perfectly seasoned rice and savory, flavorful tuna, all wrapped in a convenient, portable package. Imagin extracte the comforting warmth of steamed rice combined with the umami-rich punch of tuna – it’s a flavor combination that’s both satisfying and incredibly moreish. This recipe is designed to be ridiculously easy, proving that authentic Japanese flavors don’t require hours in the kitchen.
Why You’ll Love This Recipe:
Effortless Preparation
Authentic Taste
Perfect for On-the-Go
15-Min. Easy Japanese Tuna Onigiri
Welcome to a lightning-fast culinary adventure! Today, we’re whipping up some delicious and satisfying Japanese Tuna Onigiri, also known as rice balls. These little powerhouses are perfect for a quick lunch, a satisfying snack, or even a light breakfast. The beauty of onigiri lies in their simplicity and versatility, and this tuna version is a classic for a reason. It’s packed with flavor, incredibly easy to make, and can be customized to your liking. Forget complicated recipes; this one is designed for speed and ease, fitting perfectly into even the busiest of schedules.
The inspiration behind this recipe is to provide a truly achievable Japanese comfort food that can be enjoyed by everyone, regardless of their cooking experience. We’re focusing on readily available ingredients and straightforward techniques to ensure you have a delightful result in under 15 minutes. So, let’s get started and transform simple ingredients into portable pockets of deliciousness!
Ingredients:
Preparation
The key to making this recipe as fast as possible is to have your rice already cooked. If you’re cooking rice fresh, remember that this will add to your preparation time. Short-grain Japanese rice is ideal for onigiri because it’s sticky enough to hold its shape. If you can’t find Japanese short-grain rice, regular short-grain rice will work in a pinch, though you might find it a little less cohesive.
Making the Tuna Filling
This is where all the flavor comes in! For the canned tuna, I highly recommend using tuna packed in oil. The oil helps to keep the tuna moist and adds a richer flavor. However, if you only have tuna in water, that’s perfectly fine too. You’ll just want to drain it thoroughly to prevent a watery filling.
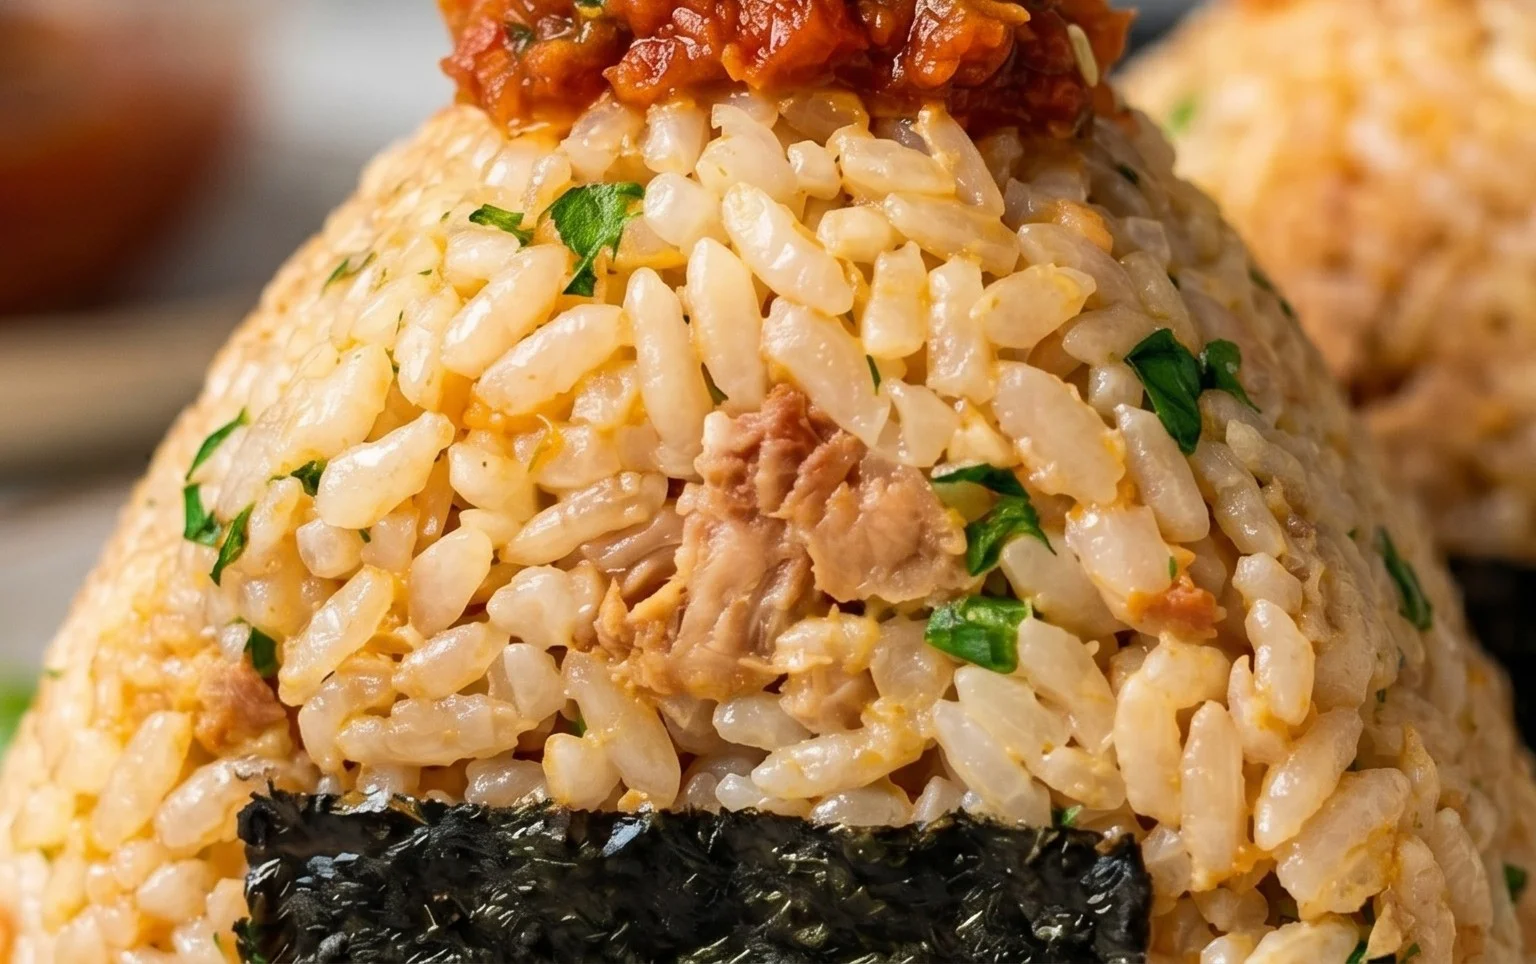
In a small bowl, combine the drained canned tuna with the Japanese mayonnaise. Japanese mayonnaise, like Kewpie, has a distinct tang and creaminess that’s slightly different from Western mayonnaise. If you don’t have Japanese mayo, regular mayonnaise will absolutely do the trick. Mix these two ingredients together until the tuna is well coated and the mixture is creamy. You’re looking for a consistency that’s moist but not dripping. This filling is simple, but it’s the foundation of the delicious flavor in our onigiri. Taste a tiny bit of the filling – if you like a bit more tang, you could add a tiny splash of soy sauce or a pinch of black pepper, but for this quick version, the mayo alone is usually sufficient.
Preparing the Rice
The rice needs to be seasoned just enough to give it a subtle flavor that complements the tuna filling. While the rice is still warm (but cool enough to handle), add the 1/2 teaspoon of salt. Gently mix the salt into the rice, ensuring it’s evenly distributed. Be careful not to mash the rice grains; we want to keep them intact. The warmth of the rice will help the salt dissolve and distribute evenly. If your rice has cooled down considerably, you might need to gently warm it up in the microwave for about 30 seconds before adding the salt. This step might seem minor, but it makes a big difference in the overall taste of your onigiri.
Assembling the Onigiri
Now for the fun part – shaping our delicious rice balls! This is where the magic happens and you get to create your own portable snacks.
1. Moisten Your Hands: This is a crucial step to prevent the rice from sticking to your hands. Fill a small bowl with water. Dip your hands into the water and rub them together. You want your hands to be wet, but not dripping. You may need to re-moisten your hands as you go, especially if you’re making multiple onigiri. This simple trick makes shaping the rice a breeze.
2. Form the Rice Base: Take about 1/2 cup of the seasoned rice and place it into the palm of one of your moistened hands. Gently press down to form a slightly flattened disc. Don’t pack it too tightly yet, as we need to make room for the filling.
3. Add the Filling: Make a small indentation in the center of the rice disc. Spoon about 1 to 1.5 tablespoons of the tuna and mayonnaise mixture into this indentation. Be generous but don’t overfill, otherwise, it will be difficult to seal the rice around it.
4. Seal and Shape: Bring the edges of the rice up and over the filling, gently enclosing it. Now, start to gently cup your hands and rotate the rice ball, applying light pressure to shape it into your desired form. The traditional shapes are triangular or spherical, but a simple round ball is perfectly fine and perhaps even easier when you’re in a hurry. Continue shaping and rotating, adding a little more rice if needed to completely cover the filling. The goal is a compact, well-formed rice ball that won’t fall apart.
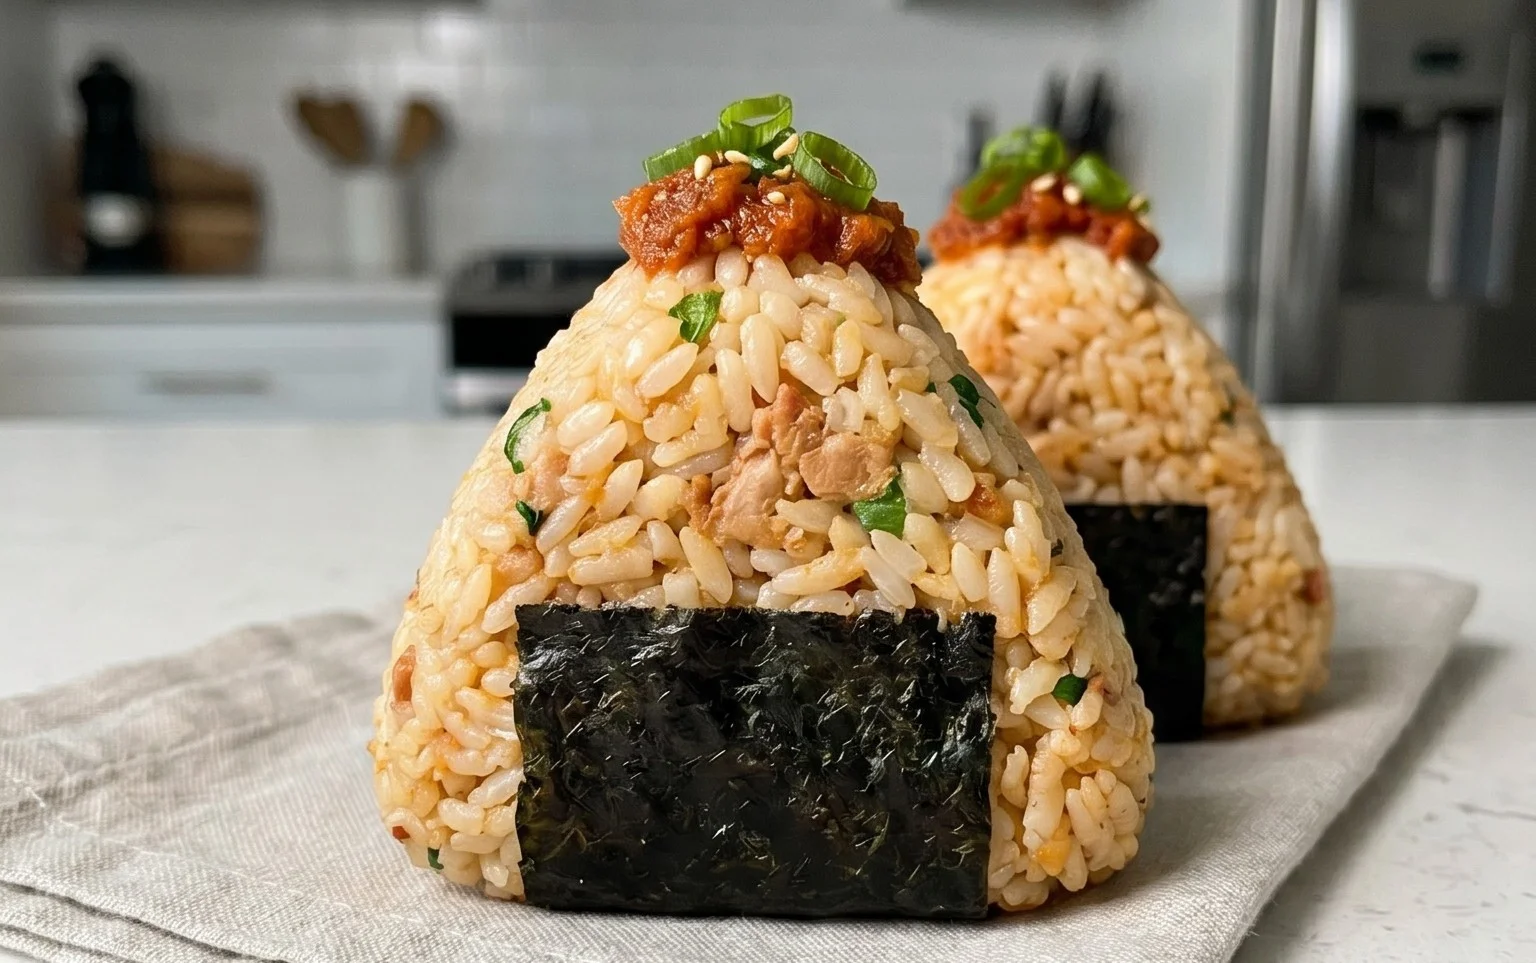
5. Wrap with Nori (Optional but Recommended): If you’re using the nori, cut one of the sheets into strips. You can use whole strips or smaller pieces depending on how you want to wrap your onigiri. A common way is to wrap a strip around the bottom of the onigiri, like a band, to make it easier to hold. Alternatively, you can wrap the entire onigiri if you prefer. If you want to add a little extra flair, sprinkle some of the optional sesame seeds onto the wet nori before applying it to the rice ball. This adds a lovely visual appeal and a subtle nutty crunch.
Repeat these steps for the remaining rice and filling. You should be able to make about 2-3 onigiri with these quantities, depending on how large you make them.
Notes:
Enjoy your incredibly quick and delicious 15-minute Japanese Tuna Onigiri! They are best enjoyed fresh, but can be stored in an airtight container at room temperature for a few hours or refrigerated for up to a day. If refrigerating, you might want to warm them up slightly before eating to soften the rice.
Conclusion:
There you have it – your ultimate guide to making delicious and incredibly quick Japanese Tuna Onigiri in just 15 minutes! This recipe truly shines because it’s not only fast but also incredibly versatile and satisfying. It’s the perfect solution for a busy lunch, a light dinner, or even a healthy snack when you’re craving something comforting and flavorful. The simplicity of the ingredients combined with the instant gratification of a perfectly formed, warm onigiri is what makes this recipe a winner in my book.
I love serving these onigiri as is, perhaps with a side of miso soup or some pickled gin extractger. They’re also fantastic packed into a bento box for a delightful midday surprise. Don’t be afraid to experiment with different fillings! While tuna mayo is classic, you could try seasoned salmon, furikake for an extra burst of flavor, or even a sweet bean paste for a different kind of treat. The possibilities are truly endless!
I genuinely encourage you to give this Japanese Tuna Onigiri recipe a try. It’s a rewarding culinary experience that’s accessible to everyone, regardless of your cooking skill level. You might just find your new go-to quick meal!
Frequently Asked Questions:
Can I make the rice ahead of time for these onigiri?
Yes, absolutely! You can cook your sushi rice in advance and store it in the refrigerator. However, for the best texture and ease of shaping, it’s best to slightly warm the rice before you start forming your onigiri. Cold, hard rice can be a bit difficult to work with.
What are some other popular onigiri fillings?
Beyond the classic tuna mayo, some other incredibly popular onigiri fillings include seasoned salmon (often grilled or flaked with soy sauce), umeboshi (pickled plum), kombu (simmered kelp), and various types of seasoned roe like mentaiko (spicy pollock roe). Using different types of furikake (Japanese rice seasoning) is also a fantastic and simple way to add flavor.
15-min. Easy Japanese Tuna Onigiri
Quick and simple tuna onigiri, perfect for a light meal or snack. Uses canned tuna and pre-cooked rice for minimal prep time.
Ingredients
-
2 cups cooked short grain rice
-
1/2 tsp salt
-
5.29 oz canned tuna (in oil recommended, or canned tuna in water)
-
2 tbsp Japanese mayo
-
2 sheets nori
-
1 tsp sesame seeds
Instructions
-
Step 1
In a bowl, mix the cooked rice with salt. If the rice is too hot, let it cool slightly so you can handle it. -
Step 2
Drain the canned tuna well and flake it into a separate bowl. Add the Japanese mayonnaise and mix until well combined. -
Step 3
Wet your hands slightly with water to prevent rice from sticking. Take about 1/2 cup of the salted rice and flatten it in your palm. -
Step 4
Place about 1-2 tablespoons of the tuna mixture in the center of the flattened rice. Gently bring the edges of the rice up and around the filling, forming a ball or triangle shape. -
Step 5
Wet your hands again and gently shape the onigiri, ensuring the filling is enclosed. Repeat with the remaining rice and tuna mixture. -
Step 6
Cut the nori sheets into strips. Wrap a strip of nori around the base of each onigiri. -
Step 7
Garnish with sesame seeds, if desired. Serve immediately.
Important Information
Nutrition Facts (Per Serving)
It is important to consider this information as approximate and not to use it as definitive health advice.
Allergy Information
Please check ingredients for potential allergens and consult a health professional if in doubt.