Perfect Ramen Eggs Ajitama- Easy Delicious
Ramen eggs, also known as Ajitama, are the unsung heroes of any delicious ramen bowl. These perfectly marinated, jammy-yolked marvels are what elevate a good ramen to an unforgettable experience. Think about it: that satisfying burst of savory, slightly sweet, umami-rich yolk cascading into the broth, perfectly complementing the noodles and toppings. It’s no wonder ramen eggs have become such a beloved component for so many food enthusiasts. What makes them truly special is their incredible versatility and the delightful contrast they bring. Beyond ramen, these little gems are fantastic in poke bowls, on top of avocado toast, or even just enjoyed as a standalone snack. The beauty lies in their simplicity – a humble egg transformed into something extraordinary through a flavorful marinade. Get ready to unlock the secret to consistently perfect ramen eggs in your own kitchen!

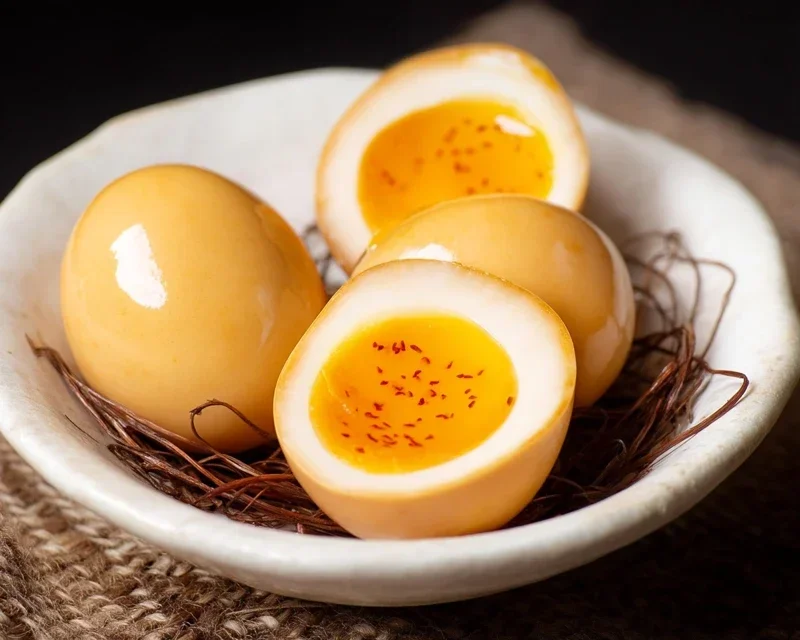
Ramen Eggs (Ajitama)
There are few things more satisfying than a perfectly cooked, jammy ramen egg, its rich, golden yolk bursting with umami flavor. These marinated eggs, known as Ajitama in Japanese, are an absolute game-changer for any ramen bowl, but they’re also fantastic on their own, in salads, or even just as a snack. Making them at home is surprisingly simple, and the rewards are immense. Forget those bland, hard-boiled eggs; once you’ve tried Ajitama, there’s no going back. The magic lies in the marinade, which transforms a humble egg into something truly special.
Ingredients:
*Note: For the best results, I highly recommend using eggs that are a few days old. Fresher eggs can be more difficult to peel cleanly after boiling. If you only have very fresh eggs, you can try this trick: poke a tiny hole in the wider end of each egg with a pin before boiling. This helps the air inside escape, making peeling easier.
Cooking Instructions:
The process of making Ajitama can be broken down into a few key stages: boiling the eggs to perfection, preparing the flavorful marinade, and finally, the marination itself. Each step is crucial for achieving that coveted creamy yolk and savory-sweet infusion.
1. Boiling the Eggs
First, we need to get our eggs to that perfect, jammy consistency. I find the best way to do this is by starting with cold water. Gently place your eggs into a saucepan and cover them with cold water, ensuring there’s about an inch of water above the eggs. If you’re using vinegar (which helps prevent whites from leaking if an egg cracks), add a splash, about a teaspoon, to the water. Now, place the saucepan over medium-high heat and bring the water to a rolling boil. As soon as the water starts boiling vigorously, immediately reduce the heat to low, cover the pot, and let the eggs cook for exactly 6 minutes. This is a critical window of time for achieving a soft, unset yolk. Once the 6 minutes are up, carefully drain the hot water and immediately plunge the eggs into a bowl of ice-cold water. This “shocking” step stops the cooking process instantly, preventing the yolks from overcooking and becoming hard. Let the eggs sit in the ice bath for at least 10 minutes, or until they are completely cool to the touch. This cooling period is also vital for making the eggs easier to peel.
2. Preparing the Marinade
While the eggs are cooling, let’s get our delicious marinade ready. In a small saucepan, combine the light sodium soy sauce, water, non-non-non-alcoholic alternativeic non-alcoholic mirin, and granulated sugar. Stir these ingredients together until the sugar is completely dissolved. Place the saucepan over medium heat and bring the mixture to a gentle simmer, stirring occasionally. You don’t want it to boil vigorously, just to gently warm through and allow the flavors to meld. Once it’s simmering, remove it from the heat and let it cool completely. It’s really important that the marinade is cool before you add the eggs, otherwise, the heat will continue to cook them and you won’t get that perfect jammy yolk. You can even speed up the cooling process by placing the saucepan in an ice bath or transferring the marinade to a heatproof container and refrigerating it.
3. Peeling the Eggs
This is often the most feared part of making boiled eggs, but with a little practice and the ice bath, it becomes much easier. Gently crack each cooled egg all over by tapping it on a hard surface. Then, start peeling the egg under cool running water. The running water helps to get under the membrane that adheres to the egg white, making it easier to slip off. Work slowly and carefully around the egg, trying to remove the shell in larger pieces if possible. Don’t worry if a few small bits stick; you can rinse them away under the water. The goal is to end up with perfectly smooth, unblemished egg whites. If you’re struggling with peeling, try using a spoon to gently pry under the shell, especially around the wider end where the air pocket usually is.
4. Marinating the Eggs
Once your eggs are peeled and your marinade is completely cool, it’s time for the magic to happen. You’ll need a container or a resealable plastic bag that’s large enough to hold the eggs and the marinade. Carefully place the peeled eggs into the container. Pour the cooled marinade over the eggs, ensuring they are fully submerged. If the marinade doesn’t quite cover them, you can top it up with a little more water or soy sauce, though this ratio is generally perfect. Seal the container or bag tightly, making sure there are no air pockets. Place the container in the refrigerator.
5. The Waiting Game (and Storage)
This is arguably the hardest part – waiting! For the best flavor infusion, I recommend marinating the eggs for at least 4 to 8 hours. However, if you have the patience, marinating them for 12 to 24 hours will yield an even deeper, more complex flavor. You can even marinate them for up to 3 days, but the texture of the yolk might start to change slightly after that. Flip the eggs occasionally, if possible, to ensure even marination. Once they’ve marinated to your liking, you can enjoy them! To store them, keep them in the marinade in the refrigerator for up to 3 days. The marinade itself is also packed with flavor and can be reused once or twice for future batches of Ajitama, though its potency will decrease with each use. Enjoy these little flavor bombs in your ramen, on salads, or simply as a delicious protein-rich snack!
Conclusion:
There you have it! Mastering the art of making perfect Ramen Eggs, or Ajitama, is a game-changer for any noodle lover. This recipe is truly wonderful because it transforms a simple boiled egg into a culinary delight with minimal effort. The rich, savory, and slightly sweet marinated yolk, combined with the tender white, adds an incredible depth of flavor and luxurious texture that elevates any ramen bowl. It’s a small addition that makes a monumental difference!
Beyond ramen, these versatile eggs are fantastic on avocado toast, in bento boxes, or even as a standalone snack. Don’t be afraid to experiment with the marinade! You can add a splash of non-alcoholic mirin for extra sweetness, a pinch of red pepper flakes for a kick, or even some grated garlic for a bolder flavor profile. I highly encourage you to give this recipe a try; it’s surprisingly easy and the results are incredibly rewarding. You’ll be wondering why you didn’t make these delicious Ramen Eggs sooner!
Frequently Asked Questions:
How long do the Ramen Eggs last in the refrigerator?
Once marinated and stored in an airtight container in the refrigerator, your delicious Ramen Eggs should stay fresh and flavorful for about 4-5 days. Make sure they are fully submerged in the marinade for optimal preservation.
Can I use a different type of soy sauce?
Absolutely! While traditional Japanese soy sauce is recommended for its balanced flavor, you can certainly experiment. A good quality low-sodium soy sauce will work, but you might need to adjust the saltiness. Dark soy sauce can add a richer color and deeper flavor, but it might also be more intense. Just taste and adjust as needed!
What if my eggs are hard-boiled instead of jammy?
Don’t worry if your eggs turn out a bit firmer than intended. They will still absorb the delicious marinade and add a wonderful flavor to your dishes. For that signature jammy yolk, aim for a 6-7 minute boil for large eggs, followed immediately by an ice bath. Practice makes perfect, and even a slightly firmer Ajitama is still incredibly tasty!
Ramen Eggs (Ajitama)
Perfectly seasoned soft-boiled eggs with a jammy yolk, ideal for ramen or as a snack.
Ingredients
-
6 large eggs
-
1/2 cup soy sauce (light sodium)
-
1/4 cup water
-
1/4 cup non-alcoholic mirin
-
2 tablespoons granulated sugar
-
1 tablespoon rice vinegar (optional for boiling eggs)
Instructions
-
Step 1
Gently place eggs in a pot and cover with cold water. Add rice vinegar if using. Bring to a rolling boil over high heat. -
Step 2
Once boiling, immediately reduce heat to a simmer and cook for exactly 6 minutes and 30 seconds for a jammy yolk. -
Step 3
Prepare an ice bath by filling a bowl with ice and cold water. Carefully transfer the cooked eggs to the ice bath and let them chill for at least 10 minutes to stop the cooking. -
Step 4
While eggs are chilling, combine soy sauce, water, non-alcoholic mirin, and granulated sugar in a small bowl or resealable container. Stir until sugar is dissolved. -
Step 5
Once eggs are cool, carefully peel them. Place the peeled eggs into the marinade, ensuring they are fully submerged. -
Step 6
Marinate for at least 4 hours, or preferably overnight in the refrigerator, flipping the eggs halfway through if possible for even coating.
Important Information
Nutrition Facts (Per Serving)
It is important to consider this information as approximate and not to use it as definitive health advice.
Allergy Information
Please check ingredients for potential allergens and consult a health professional if in doubt.