Easy Bunny Cake Recipe- Cute & Delicious Dessert
Easy Bunny Cake Recipe is here to bring a smile to your face and a delicious treat to your table! Are you looking for a way to add a touch of whimsy and sweetness to your celebrations, or perhaps just a fun baking project for a rainy afternoon? This adorable bunny cake is the answer! It’s no secret why cakes shaped like animals, especially bunnies, hold such a special place in our hearts. They evoke feelings of joy, childhood wonder, and festive cheer. What makes this particular easy bunny cake recipe so beloved is its simplicity. You don’t need to be a professional baker to achieve charming results, and the process is so enjoyable, it becomes a delightful activity for the whole family. Get ready to hop into a world of sweet success with this fantastic recipe!
Easy Bunny Cake Recipe
Spring is in the air, and that means it’s time for some adorable Easter baking! This Easy Bunny Cake recipe is the perfect centerpiece for your holiday celebrations, and the best part is, it’s surprisingly simple to put together. Forget fussy fondant and complicated sculpting; we’re going to create a charming bunny that will delight everyone, from the youngest Easter egg hunter to the most discerning sweet tooth. This recipe relies on readily available ingredients and a few clever tricks to achieve maximum bunny-ness with minimal effort. Whether you’re an experienced baker or a complete begin extractner, you’ll be able to whip up this festive treat with confidence. Let’s get started on creating your very own edible Easter friend!
Ingredients:
Preparing Your Cake Layers
The foundation of our bunny is, of course, the cake! For this recipe, you’ll need two round cake layers. You can absolutely use a store-bought cake mix and follow the package directions for a quick and easy base. If you prefer to bake from scratch, your favorite vanilla or yellow cake recipe will work beautifully. Once your cakes are baked according to their instructions, it’s crucial to let them cool completely on a wire rack. Trying to frost a warm cake is a recipe for disaster – your frosting will melt and slide right off, creating a messy, unappealing bunny. Patience here is key! Once they are thoroughly cooled, you can gently level the tops of your cake layers if they have a significant dome. This will give you a nice flat surface to work with, making assembly much easier. You can use a serrated knife to carefully slice off the domed portion.
Assembling and Frosting the Bunny
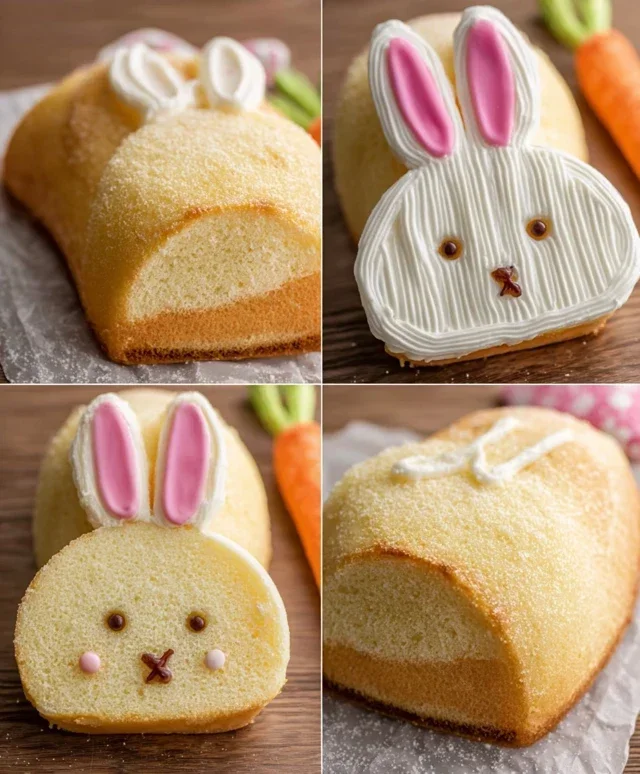
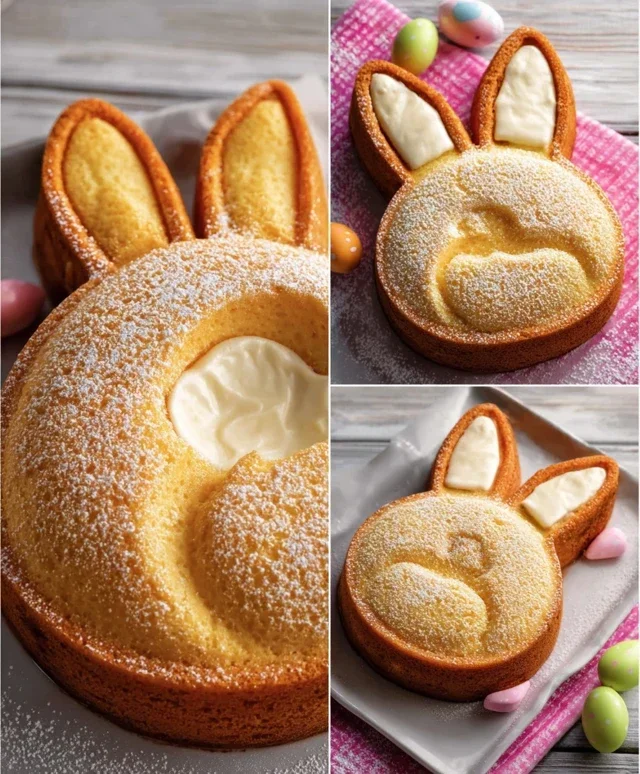
Now for the fun part – bringin extractg our bunny to life! Take one of your cooled cake layers and place it on your serving platter or cake stand. This will be the main body of our bunny. Spread a generous layer of white frosting evenly over the top of this cake. Don’t be shy with the frosting; it will help the second cake layer adhere and also contribute to the fluffy bunny appearance. Carefully place the second cake layer on top of the frosted first layer. Now, it’s time to frost the entire cake. Using your white frosting, cover the entire exterior of both stacked cake layers. Aim for a smooth, even coat to start. This will be the base coat of your bunny’s fur. For an extra fluffy texture, you can use the back of a spoon or an offset spatula to create little swirls and dabs in the frosting. This will give the illusion of fur and add to the charm of your bunny. Make sure to get frosting all along the sides, covering the edges where the two cake layers meet.
Creating the Bunny Face and Ears
This is where our bunny really starts to take shape. For the face, we’ll be using our pink frosting for the nose and adding some delightful details with chocolate. Take a small amount of your pink frosting and place it into a piping bag fitted with a small round tip. If you don’t have a piping bag, you can use a zip-top bag with a tiny corner snipped off. Pipe a cute bunny nose in the center of the top cake layer, towards the front. You can make it a little triangular or a rounded heart shape.
For the eyes and mouth, we’ll use our chocolate icing or melted chocolate. Again, if you’re using a piping bag, fit it with a small round tip. Pipe two simple circles for the eyes above the nose, leaving enough space so they don’t look too close together. Then, draw a small, sweet mouth below the nose, perhaps a little “W” shape. If you prefer, you can use toothpicks to gently place jellybeans or other small round candies for the eyes and a larger jellybean or candy for the nose.
Now, let’s create those iconic bunny ears! For this, you have a couple of options. The simplest method involves cutting out ear shapes from extra cake or even large cookies. Alternatively, you can sculpt the ears from a portion of your cake batter before baking, baking them separately, or even use sturdy cardstock cut into ear shapes and covered in frosting. If you’ve baked separate ear shapes, frost them with white frosting and once they’re secure, use a bit of pink frosting to add an inner ear detail. You can then gently press them into the top of the cake, angled upwards to give your bunny a lively appearance. If you’re using a frosting-only method, you can pipe large, elongated oval shapes for ears extending from the top of the cake.
Adding the Finishing Touches
To really make your bunny pop, we’ll add some whimsical decorations. This is where those jellybeans and colorful round candies come in! You can use them to create a charming collar around the base of your bunny’s “neck” (where the two cake layers meet). Simply press them gently into the white frosting. They can also be used to decorate the inner ears if you’ve made them from frosting or as cute little cheeks on either side of the nose. Another lovely touch is to pipe some decorative swirls or dots around the cake using your white frosting. You can also use some of the pink frosting to add a few small dots or swirls around the face for a touch of extra color. If you have any edible glitter or sprinkles, a light dusting can add a touch of magic. Remember to adjust the amount of frosting and decorations to your personal preference. The goal is a charming, homemade look that celebrates the fun of the season.
This Easy Bunny Cake recipe is a fantastic way to bring a smile to everyone’s face this Easter. It’s forgiving, adaptable, and most importantly, delicious! Enjoy the process of creating your adorable bunny and savor every bite!
Conclusion:
And there you have it! This easy bunny cake recipe is a delightful way to bring a touch of spring magic to your table, perfect for Easter celebrations or just because. Its simplicity makes it incredibly approachable, even for begin extractner bakers, proving that impressive results don’t require complicated steps. The moist cake and fluffy frosting are a classic combination that always pleases a crowd. Don’t be afraid to get creative with your decorations – the bunny theme is incredibly forgiving and fun!
This cake is wonderful served simply with a dusting of powdered sugar or as the star of your dessert spread. For a more elaborate presentation, consider serving it with fresh berries like raspberries or strawberries, or a dollop of whipped cream. If you’re feeling adventurous, try adding a touch of almond extract to the cake batter for a subtle flavor twist, or experiment with different food coloring for a pastel-hued bunny. I truly encourage you to give this easy bunny cake recipe a try. It’s a guaranteed smile-maker!
Frequently Asked Questions:
Can I make this cake ahead of time?
Absolutely! You can bake and cool the cake layers a day in advance. Once completely cooled, wrap them tightly in plastic wrap and store them at room temperature. Frost the cake closer to serving time for the freshest taste and appearance.
What if I don’t have a bunny-shaped cake pan?
No problem at all! You can easily adapt this recipe. Bake the cake in a standard round or sheet pan. Once cooled, cut out a bunny shape freehand using a template you’ve drawn on parchment paper, or simply frost it as a regular cake and add bunny ears using frosting or cut-out fondant.
How can I make the frosting more stable for decorating?
If your frosting seems a bit soft, you can add a tablespoon or two of powdered sugar at a time until it reaches your desired consistency. You can also briefly chill your frosting in the refrigerator for about 10-15 minutes before piping, which will help it hold its shape better.
Easy Bunny Cake Recipe
A simple and fun bunny-shaped cake perfect for Easter or any spring celebration. This recipe uses ready-made components for quick assembly.
Ingredients
-
Two round cake layers (use one cake mix or your favorite homemade recipe)
-
White frosting (ready-made or your favorite homemade recipe)
-
Pink frosting (or use pink gel food coloring on white frosting)
-
Chocolate icing or melted chocolate for details
-
Jellybeans or colorful round candies
-
Piping bags
Instructions
-
Step 1
Bake or prepare your two round cake layers according to your chosen recipe. Let them cool completely. -
Step 2
Place one cake layer on your serving platter. Spread a generous amount of white frosting on top. -
Step 3
Place the second cake layer on top of the first. Frost the entire cake with white frosting, creating a smooth base for the bunny. -
Step 4
Using pink frosting, pipe two large circles on top of the cake for the bunny’s ears. You can also pipe smaller pink circles inside for the inner ear detail. -
Step 5
Use chocolate icing or melted chocolate to pipe two small dots for the eyes and a triangle or small oval for the nose. -
Step 6
Decorate the bunny’s body with jellybeans or colorful round candies, arranging them in a pattern or filling the space.
Important Information
Nutrition Facts (Per Serving)
It is important to consider this information as approximate and not to use it as definitive health advice.
Allergy Information
Please check ingredients for potential allergens and consult a health professional if in doubt.