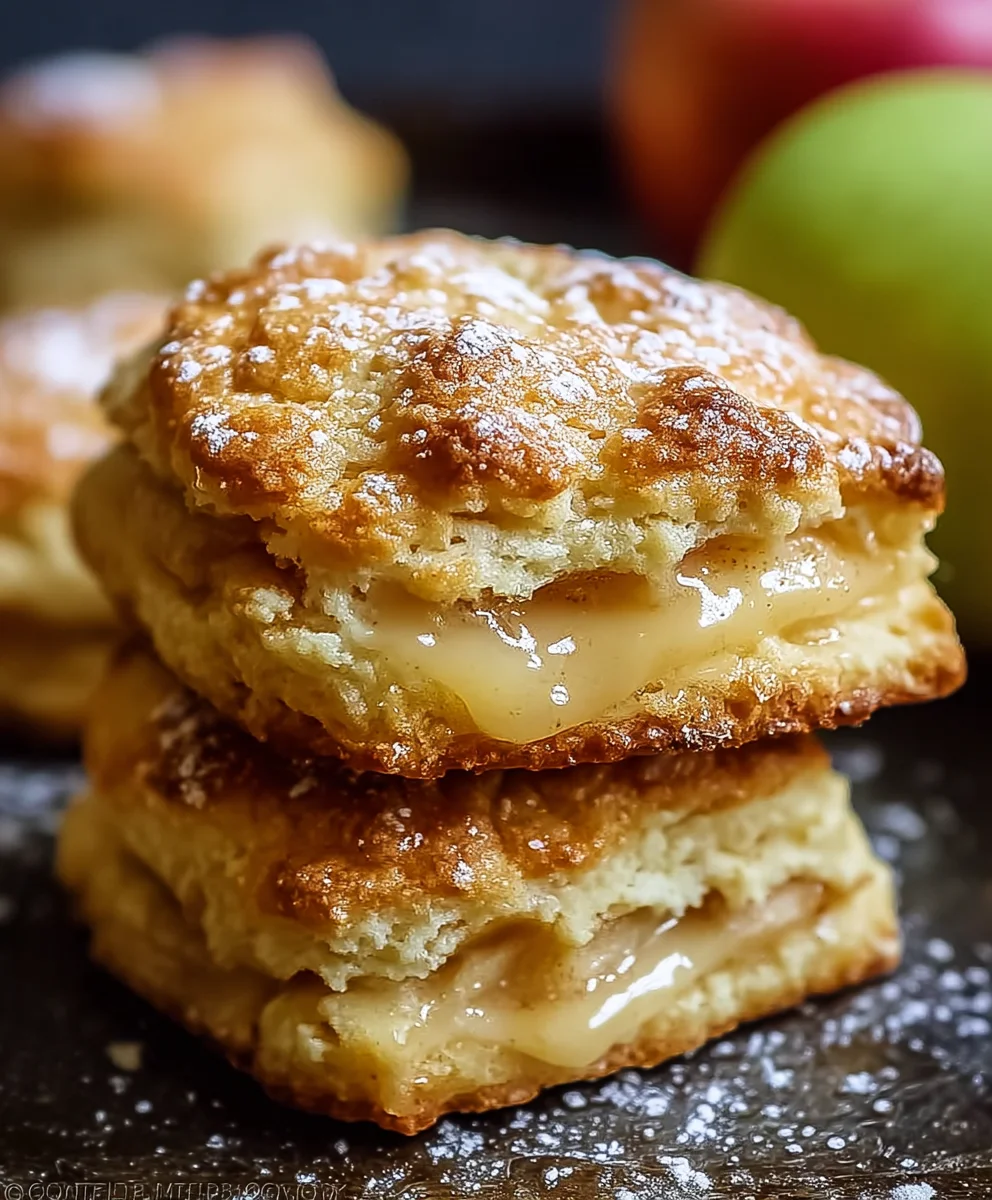
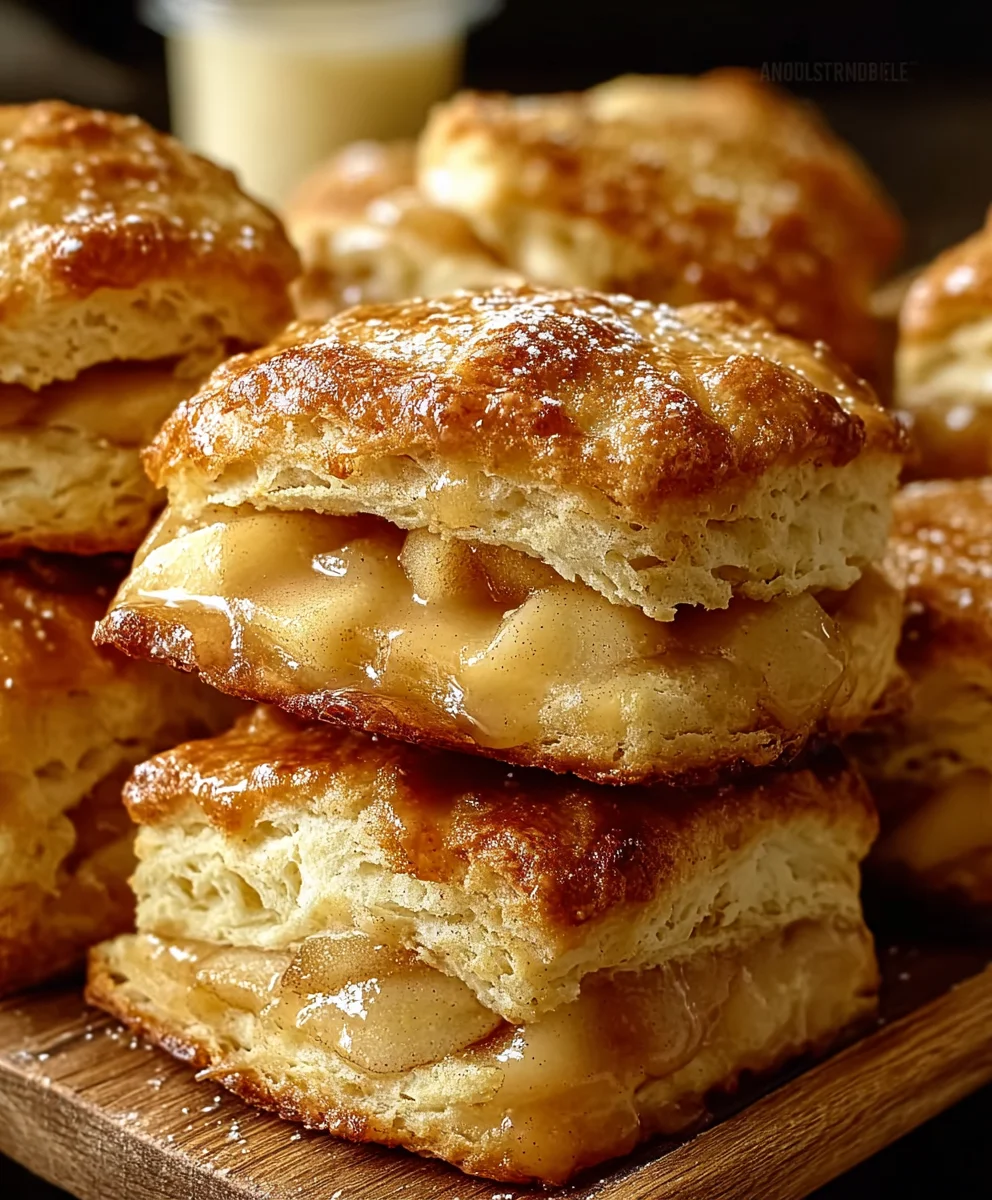
Apple Pie Biscuits-Easy Quick Dessert Recipe
Apple Pie Biscuits are more than just a baked good; they’re a warm hug in edible form, a delightful dance of flaky pastry and sweet, spiced apples that transports you straight to comfort. We all have those quintessential flavors that evoke memories of childhood, cozy evenings, and simpler times, and for so many, that’s the unmistakable aroma of apple pie. But what if you could capture that beloved essence in a bite-sized, incredibly easy-to-make treat? That’s where these fantastic Apple Pie Biscuits come in! They’re the perfect answer for when you crave that classic apple pie flavor but don’t have the time (or the inclination) for a full-blown, hour-long baking project. What truly makes these Apple Pie Biscuits so special is their ingenious simplicity, marrying the buttery tenderness of homemade biscuits with the comforting sweetness of cinnamon-spiced apples, all without the fuss of rolling out pie dough. Prepare yourself for a delightful surprise that will have everyone asking for seconds.
Ingredients:
- 1 can refrigerated buttermilk biscuits
- 1 can (approximately 21 ounces) apple pie filling, chopped
- 1/2 cup unsalted butter, melted
- 1/2 cup packed light brown sugar
- 1 tablespoon ground cinnamon
- 1/8 teaspoon ground nutmeg
- 1 teaspoon vanilla extract
- 1/2 cup confectioners’ sugar (also known as powdered sugar or icing sugar)
- 1 tablespoon milk
Preparing the Apple Pie Filling Mixture
The first step to creating these delightful Apple Pie Biscuits is to prepare the apple filling. You’ll want to start by opening your can of apple pie filling. If the apple chunks are particularly large, you might want to give them a quick chop with a knife to ensure they distribute evenly throughout the biscuits. This will also make them easier to bite into. In a medium-sized bowl, combine the chopped apple pie filling with the melted unsalted butter. Stir these together thoroughly until all the apple pieces are well coated in the melted butter. This butter coating is crucial as it will help the apples soften further during baking and add a richness to the overall flavor profile. Next, add the packed light brown sugar to this mixture. The brown sugar not only contributes sweetness but also a lovely caramel-like depth. Stir in the ground cinnamon and the 1/8 teaspoon of ground nutmeg. These spices are the quintessential flavors of apple pie and will infuse the biscuits with that warm, comforting aroma. Finally, stir in the teaspoon of vanilla extract. Vanilla enhances the other flavors and adds a subtle complexity. Mix everything together until it’s well combined. You should have a gooey, fragrant apple mixture ready to go.
Assembling the Biscuits
Now it’s time to bring our Apple Pie Biscuits together. Take your can of refrigerated buttermilk biscuits and open it carefully. You’ll want to work relatively quickly so the biscuits don’t start to dry out. You can either separate the biscuits as they come out of the can or you can flatten them slightly before adding the filling. For this recipe, I find it helpful to gently flatten each biscuit into a disk shape, about 1/4 inch thick. This gives you a slightly larger surface area to work with and helps prevent the filling from oozing out too much during baking. Place about one to two tablespoons of the prepared apple pie filling mixture onto the center of each flattened biscuit. Be careful not to overfill them, as this can lead to a messy bake. Once you have the filling on each biscuit, you’ll need to enclose it. The easiest way to do this is to bring the edges of the biscuit dough up and pinch them together to seal the filling inside. Think of it like making a small little dumpling or a mini pot pie. Ensure the seal is as tight as possible. You can do this by twisting the top gently and pinching, or by carefully pressing the edges together multiple times. Place the senon-alcoholic aled biscuits, seam-side down, into a greased 9×13 inch baking dish. Arrange them so they are touching each other slightly, as this will help them to steam and become even more tender as they bake.
The Creamy Glaze
While the biscuits are baking and filling the air with a wonderful aroma, we can prepare the simple yet delicious glaze. This glaze will add a touch of sweetness and a beautiful finish to our Apple Pie Biscuits. In a small bowl, combine the 1/2 cup of confectioners’ sugar with the 1 tablespoon of milk. Confectioners’ sugar is very fine and blends easily, creating a smooth glaze. Start by adding just one tablespoon of milk. Whisk the mixture together vigorously. You’re looking for a pourable consistency. If it seems too thick, you can add a tiny bit more milk, just a teaspoon at a time, until it reaches your desired consistency. It should be thick enough to coat the biscuits but thin enough to drizzle easily. If, by chance, you add too much milk and it becomes too thin, you can always add a little more confectioners’ sugar to thicken it up. Set this glaze aside, as we’ll be drizzling it over the warm biscuits right after they come out of the oven.
Baking to Golden Perfection
Preheat your oven to 375°F (190°C) before you begin extract assembling the biscuits. This ensures the oven is at the correct temperature when your baking dish is ready. Once your Apple Pie Biscuits are assembled in the greased baking dish and the glaze is ready, it’s time for them to bake. Place the baking dish on the center rack of your preheated oven. Bake for approximately 20-25 minutes. You’re looking for the biscuits to be puffed up, golden brown on top, and for the filling to be bubbling around the edges. The exact baking time can vary slightly depending on your oven, so it’s a good idea to keep an eye on them during the last few minutes of baking. If the tops start to brown too quickly, you can loosely tent the dish with aluminum foil. This will protect the tops from burning while allowing the insides to cook through. Once they’re beautifully golden and bubbly, carefully remove the baking dish from the oven. Be sure to use oven mitts, as the dish will be very hot.
Finishing Touches and Serving
As soon as you remove the Apple Pie Biscuits from the oven, while they are still hot, it’s time to add that delightful glaze. Take your prepared confectioners’ sugar glaze and drizzle it generously over the tops of the warm biscuits. The heat from the biscuits will help the glaze to melt slightly and create a beautiful, shiny finish. You can use a spoon to create artistic drizzles, or simply pour it over the entire top of the baking dish. Allow the glaze to set for just a few minutes before serving. These Apple Pie Biscuits are best enjoyed warm, when the biscuit is soft and tender, the apple filling is gooey and spiced, and the glaze is slightly melty. They are perfect as a breakfast treat, a snack, or even a simple dessert. You can serve them directly from the baking dish. If you’re feeling extra decadent, a small scoop of vanilla ice cream or a dollop of whipped cream on top would be absolutely divine!
Conclusion:
And there you have it – a delightful batch of Apple Pie Biscuits, ready to transport your taste buds straight to autumn comfort! This recipe is wonderfully straightforward, offering all the warm, spiced apple flavors of a traditional pie without the fuss of rolling dough. We hope you enjoyed creating these as much as we loved developing them. They are perfect for a cozy breakfast, a delightful afternoon treat, or even a simple dessert. Feel free to get creative with your toppings; a drizzle of caramel sauce or a dollop of whipped cream can elevate these even further. Don’t be afraid to experiment with different apple varieties for subtle flavor nuances, or add a pinch of nutmeg for an extra layer of spice. Happy baking, and enjoy every bite!
Frequently Asked Questions:
Can I make Apple Pie Biscuits ahead of time?
You can prepare the biscuit dough and the apple filling separately up to a day in advance and store them in the refrigerator. However, for the best texture and flavor, it’s recommended to assemble and bake the Apple Pie Biscuits just before serving.
What kind of apples are best for Apple Pie Biscuits?
For the best flavor and texture, choose baking apples that hold their shape and have a good balance of sweetness and tartness. Varieties like Honeycrisp, Fuji, Gala, or Granny Smith are excellent choices. You can also use a combination of sweet and tart apples for a more complex flavor profile.
Can I freeze baked Apple Pie Biscuits?
Yes, you can freeze baked Apple Pie Biscuits. Allow them to cool completely, then wrap them tightly in plastic wrap and then in aluminum foil. Reheat them in a moderate oven (around 350°F or 175°C) until warmed through.
Apple Pie Biscuits-Easy Quick Dessert Recipe
A quick and easy dessert recipe for delightful apple pie-filled biscuits, topped with a simple glaze.
Ingredients
-
1 can refrigerated buttermilk biscuits
-
1 can (approximately 21 ounces) apple pie filling, chopped
-
1/2 cup unsalted butter, melted
-
1/2 cup packed light brown sugar
-
1 tablespoon ground cinnamon
-
1/8 teaspoon ground nutmeg
-
1 teaspoon vanilla extract
-
1/2 cup confectioners’ sugar
-
1 tablespoon milk
Instructions
-
Step 1
Prepare the apple filling: Chop apple pie filling if chunks are large. Combine with melted butter, brown sugar, cinnamon, nutmeg, and vanilla extract in a bowl. Mix well until all ingredients are incorporated and the apples are coated. -
Step 2
Assemble the biscuits: Flatten each refrigerated buttermilk biscuit into a disk. Place 1-2 tablespoons of the apple filling mixture onto the center of each flattened biscuit. Carefully bring the edges of the biscuit dough up and pinch them together to seal the filling inside, forming a dumpling shape. Place the sealed biscuits, seam-side down, into a greased 9×13 inch baking dish, arranging them so they are slightly touching. -
Step 3
Prepare the glaze: In a small bowl, whisk together confectioners’ sugar and milk until a smooth, pourable consistency is achieved. Add more milk or confectioners’ sugar as needed to reach the desired texture. -
Step 4
Bake the biscuits: Preheat oven to 375°F (190°C). Bake the biscuits in the prepared dish for 20-25 minutes, or until puffed up, golden brown, and the filling is bubbling. If the tops brown too quickly, loosely tent the dish with aluminum foil. -
Step 5
Finish and serve: Remove the baking dish from the oven. While the biscuits are still hot, drizzle the prepared glaze generously over the tops. Allow the glaze to set for a few minutes before serving warm.
Important Information
Nutrition Facts (Per Serving)
It is important to consider this information as approximate and not to use it as definitive health advice.
Allergy Information
Please check ingredients for potential allergens and consult a health professional if in doubt.