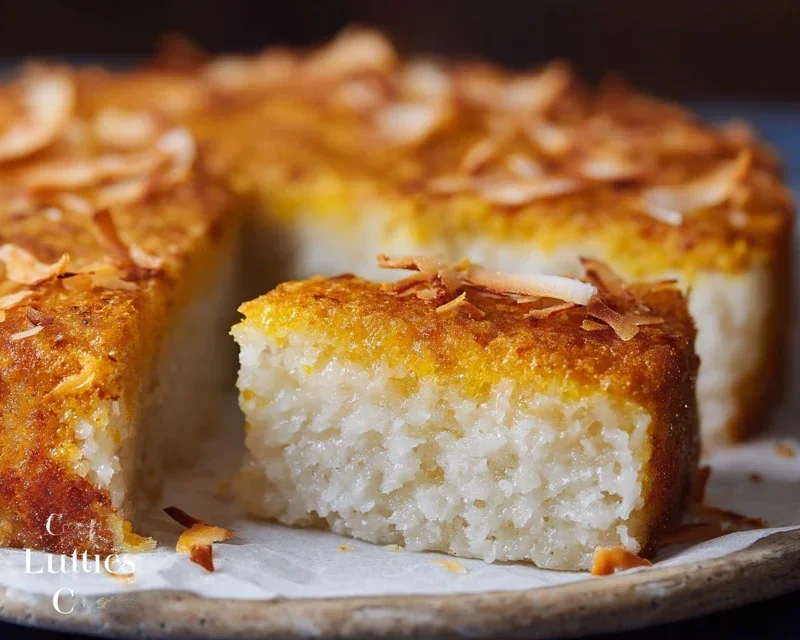
Sticky Coconut Cake – Easy Tropical Dessert Recipe
Sticky Coconut Cake. Oh, this is the one. The cake that whispers promises of tropical escapes and warm, comforting embraces with every single bite. If you’ve ever craved a dessert that’s both decadently rich and delightfully fragrant, then our Sticky Coconut Cake is about to become your new obsession. What is it about this particular confection that has us all swooning? It’s that irresistible combination of tender, moist cake infused with the sweet, nutty essence of coconut, all bathed in a luscious, golden caramel glaze that clings to every crum extractb. This isn’t just any cake; it’s an experience. It’s the perfect centerpiece for any celebration, a comforting treat on a rainy afternoon, or simply a reason to smile. Get ready to fall head over heels for the unparalleled charm of this Sticky Coconut Cake!

Sticky Coconut Cake
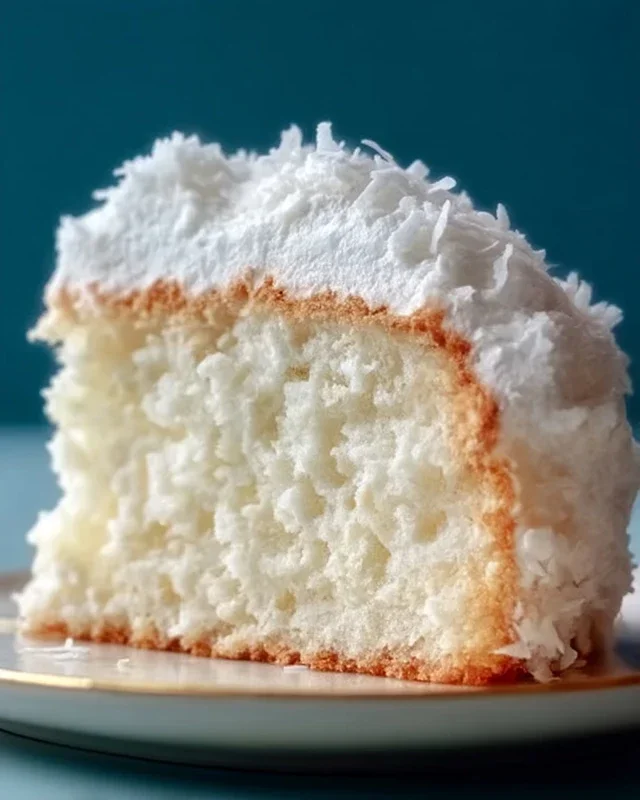
This Sticky Coconut Cake is a delightful treat that combines the rich, creamy flavor of coconut with a satisfyingly chewy texture. It’s surprisingly simple to make and the result is a wonderfully moist and fragrant cake that’s perfect for any occasion, from a casual afternoon tea to a special celebration. The beauty of this cake lies in its simplicity and the incredible flavor that comes from just a few key ingredients. The full-fat coconut milk lends an unparalleled richness and moisture, while the shredded coconut provides delightful texture and an intense coconut aroma. Don’t be intimidated by the glutinous rice flour; it’s the secret to that irresistible sticky, chewy crum extractb that sets this cake apart.
Ingredients:
Preparation and Mixing
The journey to this delicious sticky coconut cake begin extracts with preparing our ingredients and creating a harmonious batter. It’s crucial to have everything measured out and ready before you start mixing, as the process moves along quite smoothly.
First, let’s get our wet ingredients ready. In a large mixing bowl, combine the 2 egg yolks with the 1¼ cup of granulated sugar. This is where we start building the sweetness and richness. Whisk these together vigorously until the mixture becomes pnon-alcoholic ale and slightly fluffy. This process, known as creaming, incorporates air which will help with the cake’s texture. Next, pour in the 2¼ cups of full-fat canned coconut milk. Make sure you use full-fat for the best flavor and texture; the lighter versions won’t give you that decadent creaminess. Add the 1 teaspoon of vanilla extract at this stage as well. Vanilla is a wonderful flavor enhancer, and it pairs beautifully with coconut. Whisk everything together until it’s well combined and you have a smooth, homogenous liquid.
Now, it’s time to incorporate the dry ingredients. In a separate bowl, measure out your 1½ cups of glutinous rice flour. This flour is what gives our cake its characteristic sticky and chewy texture. It’s different from regular rice flour, so be sure to use glutinous rice flour for the best results. Gently fold the glutinous rice flour into the wet coconut milk mixture. It’s important not to overmix at this stage. We want to combine them just until there are no dry streaks of flour visible. Overmixing can develop the gluten in the flour, which can lead to a tougher cake, and we’re aiming for that delightful chegrape juicess. Finally, gently fold in the 3 cups of shredded sweetened coconut. This is where a lot of that delicious coconut flavor and texture will come from. Distribute it evenly throughout the batter.
Preparing the Egg Whites
While we’ve incorporated the yolks into our batter, the egg whites play a crucial role in adding lightness and structure to our cake. In a clean, dry bowl (any trace of grease will prevent the whites from whipping properly), add the 2 egg whites. Using an electric mixer, or a whisk and a lot of elbow grease, begin extract to beat the egg whites. Start on a low speed and gradually increase to medium-high. You’re looking to achieve stiff peaks. This means that when you lift the whisk out of the egg whites, the peaks that form will stand straight up and hold their shape without drooping. This step is vital for creating a slightly airy texture within the otherwise dense and chewy cake.
Baking the Sticky Coconut Cake
Now that our batter is ready and our egg whites are whipped, it’s time to bring it all together and bake this wonderful creation.
4. Gently fold the whipped egg whites into the coconut batter. This is a delicate process. Use a spatula and a folding motion – cutting down through the center of the mixture, scooping along the bottom, and folding over the top. Rotate the bowl as you go. The goal is to incorporate the airy egg whites without deflating them too much. You want to see a beautifully combined batter that’s still relatively airy, with no streaks of egg white remaining. This will give the cake a lighter, more enjoyable texture.
5. Prepare your baking pan. I usually like to grease and line a 9-inch round cake pan with parchment paper. This ensures that the cake won’t stick and makes for easy removal after baking. Pour the prepared batter into the greased and lined pan, spreading it evenly with your spatula.
6. Bake the cake in a preheated oven at 350°F (175°C) for approximately 45-55 minutes. The baking time can vary depending on your oven, so it’s always best to check for doneness. The cake is ready when it’s golden brown on top and a toothpick inserted into the center comes out clean, or with just a few moist crum extractbs attached (remember, this is a sticky cake, so a few moist crum extractbs are perfectly normal and desired).
7. Once baked, let the cake cool in the pan for about 10-15 minutes before inverting it onto a wire rack to cool completely. This initial cooling period in the pan helps the cake to set and prevents it from breaking when you unmold it.
This Sticky Coconut Cake is best enjoyed at room temperature. It’s wonderful on its own, but you can also serve it with a dollop of whipped cream or a scoop of vanilla ice cream for an extra decadent treat. The combination of the chewy, moist crum extractb and the intense coconut flavor makes this cake truly unforgettable. Enjoy every delightful bite!
Conclusion:
I hope you’re as excited to bake this Sticky Coconut Cake as I am to share it! This recipe truly is a winner, delivering an incredibly moist and flavorful cake with that irresistible sticky, caramel-like topping. The combination of rich coconut milk, sweet coconut flakes, and a hint of brown sugar creates a delightful texture and aroma that will fill your kitchen with warmth. It’s surprisingly straightforward to make, making it perfect for both novice bakers and experienced cake enthusiasts looking for a new favorite. This cake is wonderful served warm, perhaps with a dollop of whipped cream or a scoop of vanilla ice cream. For a different twist, consider adding a sprinkle of toasted slivered almonds over the sticky topping before it sets for an extra layer of crunch and flavor. Don’t hesitate to experiment with adding a touch of lime zest to the batter for a bright citrus note. I truly encourage you to give this sticky coconut cake a try – I promise you won’t be disappointed!
Frequently Asked Questions:
Can I make this cake ahead of time?
Yes, absolutely! This sticky coconut cake actually holds up very well and can be made a day in advance. Store it in an airtight container at room temperature for up to two days. The flavors often meld and deepen beautifully overnight.
My sticky topping isn’t as gooey as I’d like. What went wrong?
A few things could contribute to a less gooey topping. Ensure you’re using good quality brown sugar, as this is key to the caramelization. Also, make sure you’re cooking the topping mixture for the specified time to allow it to thicken properly before pouring it over the cake. Don’t overbake the cake itself, as this can also affect the topping’s consistency.
What kind of coconut milk is best for this recipe?
Full-fat canned coconut milk is highly recommended for this sticky coconut cake. It provides the richest flavor and the creamiest texture, which is essential for both the cake batter and the sticky topping. Light coconut milk will likely result in a less decadent outcome.
Sticky Coconut Cake
A decadent and moist cake made with coconut milk and shredded coconut, offering a wonderfully sticky texture and tropical flavor.
Ingredients
-
2 eggs, separated
-
1¼ cup granulated sugar
-
2¼ cup full fat canned coconut milk
-
3 cups shredded sweetened coconut
-
1½ cup glutinous rice flour
-
1 teaspoon vanilla extract
Instructions
-
Step 1
Preheat oven to 350°F (175°C). Grease and flour a 9×13 inch baking pan. -
Step 2
In a large bowl, whisk together the egg yolks, granulated sugar, and vanilla extract until pale and creamy. -
Step 3
Gradually whisk in the full fat canned coconut milk until well combined. -
Step 4
In a separate bowl, combine the shredded sweetened coconut and glutinous rice flour. Add this dry mixture to the wet ingredients and stir until just combined. Do not overmix. -
Step 5
In another clean bowl, beat the egg whites until stiff peaks form. -
Step 6
Gently fold the beaten egg whites into the cake batter until no white streaks remain. -
Step 7
Pour the batter into the prepared baking pan and spread evenly. -
Step 8
Bake for 35-45 minutes, or until a wooden skewer inserted into the center comes out clean. The top should be golden brown and slightly firm.
Important Information
Nutrition Facts (Per Serving)
It is important to consider this information as approximate and not to use it as definitive health advice.
Allergy Information
Please check ingredients for potential allergens and consult a health professional if in doubt.