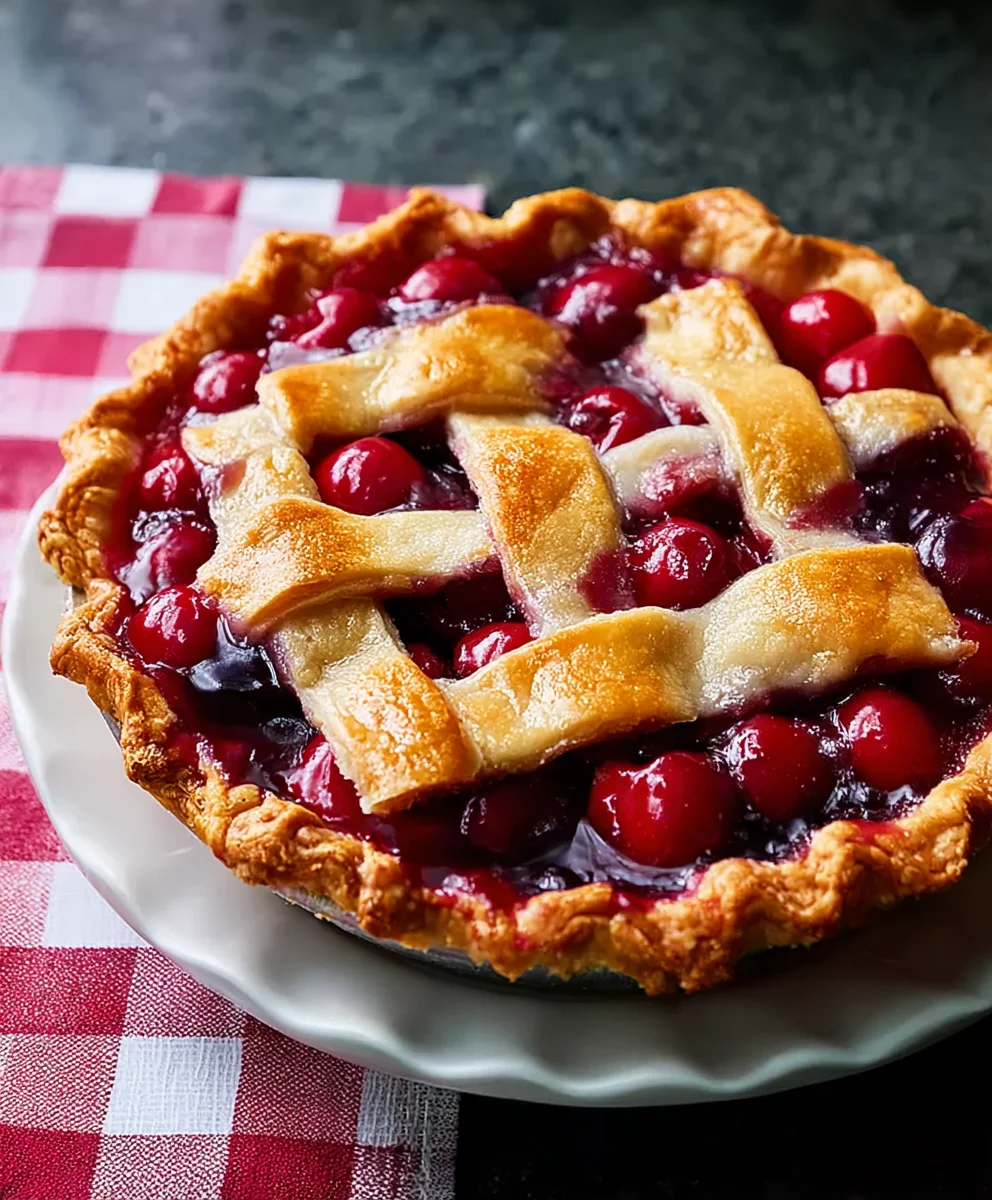
Classic Cherry Pie Recipe-Sweet & Tart Delight
Classic Cherry Pie, a timeless dessert that conjures images of summer picnics and cozy evenings, holds a special place in the hearts of many. There’s an undeniable magic in its vibrant red filling, encased in a golden, flaky crust. What is it about this particular pie that makes it so universally beloved? Perhaps it’s the perfect balance of sweet and tart cherries, a symphony of flavors that dance on your tongue with every bite. Or maybe it’s the comforting aroma that fills the kitchen as it bakes, a promise of pure indulgence. This isn’t just any dessert; it’s a nostalgic journey, a celebration of simple pleasures, and a testament to the enduring appeal of a well-made, classic cherry pie. We’re diving deep into what makes this pie truly extraordinary, and of course, sharing a recipe that will help you recreate that perfect slice in your own home. Get ready to experience the ultimate classic cherry pie.

Ingredients:
- 28 ounces pitted cherries (this will be about 5 heaping cups, so don’t be shy when measuring them out)
- 2 tablespoons fresh lemon juice (this brightens the cherry flavor and helps the pie set)
- 1 cup granulated sugar (adjust slightly depending on the sweetness of your cherries)
- 3/4 teaspoon Diamond Crystal kosher salt (essential for balancing sweetness and enhancing flavors)
- 1/3 cup plus 1 teaspoon tapioca starch (this acts as our thickener, giving us that perfect pie filling consistency)
- 1 double pie crust dough (store-bought or homemade, chilled until ready to use)
- For the egg wash (optional, but recommended for a golden-brown, glossy crust):
- 1 large egg
- 1 large egg yolk
- 1 tablespoon heavy cream
- 1/8 teaspoon kosher salt
Preparing the Cherry Filling
Step 1: Combine the Cherries and Flavor Enhancers
Begin extract by placing your 28 ounces of pitted cherries into a large mixing bowl. If you’re using frozen cherries, make sure they are completely thawed and well-drained to avoid a watery pie. Add the 2 tablespoons of fresh lemon juice to the cherries. The lemon juice not only adds a delightful tang that complements the sweetness of the cherries but also helps to set the pie filling. Next, sprinkle in the 1 cup of granulated sugar and the 3/4 teaspoon of Diamond Crystal kosher salt. The salt is crucial here; it doesn’t make the pie salty, but rather rounds out all the flavors, preventing the sweetness from becoming cloying.
Step 2: Add the Thickener
Now it’s time to incorporate our thickener, the tapioca starch. Add the 1/3 cup plus 1 teaspoon of tapioca starch directly to the bowl with the cherries, sugar, and lemon juice. Gently stir everything together until the cherries are evenly coated. You want to ensure that there are no dry pockets of tapioca starch, as this could lead to lumps in your filling. Let this mixture sit for about 15 to 20 minutes. This resting period allows the tapioca stargin extractto begin absorbing some of the cherry juices, which will help create a beautifully thickened filling once baked. This step is key to preventing a runny pie.
Assembling the Classic Cherry Pie
Step 3: Preparing the Pie Crusts
While the cherry filling is resting, it’s time to get your double pie crust dough ready. Take one of your chilled pie crusts and carefully place it into a 9-inch pie plate. Gently press the dough into the bottom and up the sides of the plate, making sure there are no air bubbles trapped underneath. Trim any excess dough, leaving about a 1-inch overhang. You’ll use this overhang to seal the top crust later. For the top crust, you have a few options. You can leave it as a solid piece and cut vents for steam to escape, or you can cut it into strips for a lattice top. A lattice top is visually appealing and allows for excellent steam release, contributing to a crispier crust. If you are opting for a solid top crust, make sure to cut several slits with a sharp knife to allow steam to escape during baking. This prevents the crust from puffing up unevenly and potentially breaking.
Step 4: Filling the Pie and Sealing the Edges
Once your cherry filling has rested, give it a final gentle stir to ensure the tapioca starch is well distributed. Pour the entire cherry mixture into the prepared bottom pie crust. Spread it out evenly. Now, take your top pie crust and carefully place it over the filling. If you’re doing a solid top crust, lay it over the filling and press the edges of the top crust into the overhang of the bottom crust. If you’re making a lattice, arrange your strips over the filling and then press the edges to seal. Crimp the edges of the pie together decoratively. You can do this by pinching the dough with your fingers or using the tines of a fork. A good seal is important to keep the juices contained within the pie.
Baking the Perfect Cherry Pie
Step 5: Applying the Egg Wash and Baking
If you’ve chosen to use the optional egg wash for a golden and glossy finish, now is the time to prepare it. In a small bowl, whisk together the 1 large egg, 1 large egg yolk, 1 tablespoon of heavy cream, and the 1/8 teaspoon of kosher salt. Lightly brush this mixture all over the top crust of your pie. This step is purely for aesthetics and flavor, but it truly elevates the final appearance of your Classic Cherry Pie. Preheat your oven to 400 degrees Fahrenheit (200 degrees Celsius). Place the pie on a baking sheet. This is a crucial step as it will catch any drips from the filling that might bubble over, preventing a mess in your oven. Bake for 20 minutes at 400 degrees Fahrenheit (200 degrees Celsius). Then, reduce the oven temperature to 375 degrees Fahrenheit (190 degrees Celsius) and continue to bake for another 30 to 40 minutes, or until the crust is golden brown and the filling is visibly bubbling through the vents or lattice. If the crust starts to brown too quickly, you can loosely tent the pie with aluminum foil. Let the pie cool completely on a wire rack for at least 3-4 hours before slicing and serving. This cooling time is essential for the filling to set properly; cutting into a hot pie will result in a runny mess.
Conclusion:
I hope you’ve enjoyed learning how to create the perfect Classic Cherry Pie! This timeless dessert, with its flaky crust and sweet-tart cherry filling, is a true crowd-pleaser. We’ve covered everything from preparing the dough to achieving that golden-brown finish. Remember, the key to a great pie is patience and fresh ingredients. Don’t be afraid to experiment and make this Classic Cherry Pie your own!
Serving this Classic Cherry Pie is a joy. It’s absolutely divine served warm with a scoop of vanilla bean ice cream, a dollop of whipped cream, or even a drizzle of créme anglaise. For a more elegant touch, a sprinkle of powdered sugar just before serving adds a beautiful presentation. This pie also makes a wonderful addition to holiday gatherings, potlucks, or simply a cozy night in.
When it comes to variations, feel free to play with the spices. A pinch of nutmeg or a touch of almond extract can add an interesting twist to the cherry filling. If you’re feeling adventurous, consider adding a crum extractble topping instead of a double crust for a different texture. You could also swap out some of the cherries for other berries for a mixed fruit sensation. The possibilities are endless!
So go forth and bake your heart out! The aroma of a freshly baked Classic Cherry Pie filling your home is one of life’s simple, yet profound pleasures. I encourage you to try this recipe and share it with your loved ones. Happy baking!
Frequently Asked Questions about Classic Cherry Pie:
Q1: How can I prevent my Classic Cherry Pie crust from becoming soggy?
A: Ensuring your crust is chilled thoroughly before baking is crucial. Blind baking the bottom crust partially before adding the filling can also help. Another tip is to make sure your cherry filling is not too watery; thickening it slightly with cornstarch or tapioca starch will make a big difference.
Q2: Can I use frozen cherries for my Classic Cherry Pie?
A: Yes, you absolutely can! If using frozen cherries, do not thaw them completely before adding them to your filling. They will release more liquid as they bake, so you might want to increase the thickener slightly. Drain them well before incorporating them into the pie to manage excess moisture.
Q3: My Classic Cherry Pie filling is too tart. What can I do?
A: The tartness of cherries can vary greatly. You can adjust the sweetness by adding more sugar to the filling. Taste a small amount of the filling before pouring it into the crust, and add sugar incrementally until it reaches your desired sweetness level. A tiny pinch of salt can also help balance the flavors.
Classic Cherry Pie Recipe-Sweet & Tart Delight
A classic sweet and tart cherry pie with a flaky crust and a perfectly set filling.
Ingredients
-
28 ounces pitted cherries
-
2 tablespoons fresh lemon juice
-
1 cup granulated sugar
-
3/4 teaspoon Diamond Crystal kosher salt
-
1/3 cup plus 1 teaspoon tapioca starch
-
1 double pie crust dough
-
1 large egg (optional)
-
1 large egg yolk (optional)
-
1 tablespoon heavy cream (optional)
-
1/8 teaspoon kosher salt (optional)
Instructions
-
Step 1
Combine pitted cherries, fresh lemon juice, granulated sugar, and kosher salt in a large mixing bowl. Let sit for 15-20 minutes to allow juices to release and sugar to dissolve. If using frozen cherries, ensure they are thawed and drained. -
Step 2
Add tapioca starch to the cherry mixture and stir gently until evenly coated. Let this mixture sit for another 15-20 minutes to begin thickening. -
Step 3
Prepare the pie crusts. Line a 9-inch pie plate with one chilled pie crust dough, pressing it into the bottom and sides. Trim excess dough, leaving a 1-inch overhang. Prepare the top crust by either cutting vents or preparing strips for a lattice. -
Step 4
Pour the thickened cherry filling into the prepared bottom pie crust. Place the top crust over the filling, sealing the edges by crimping or pressing with a fork. Ensure a good seal to prevent leaks. -
Step 5
For a golden crust, whisk together the optional egg wash ingredients (egg, egg yolk, heavy cream, salt) and brush over the top crust. Preheat oven to 400°F (200°C). Place the pie on a baking sheet. -
Step 6
Bake at 400°F (200°C) for 20 minutes. Reduce oven temperature to 375°F (190°C) and bake for an additional 30-40 minutes, or until the crust is golden brown and the filling is bubbling. Tent with foil if the crust browns too quickly. Let cool completely on a wire rack for at least 3-4 hours before slicing.
Important Information
Nutrition Facts (Per Serving)
It is important to consider this information as approximate and not to use it as definitive health advice.
Allergy Information
Please check ingredients for potential allergens and consult a health professional if in doubt.