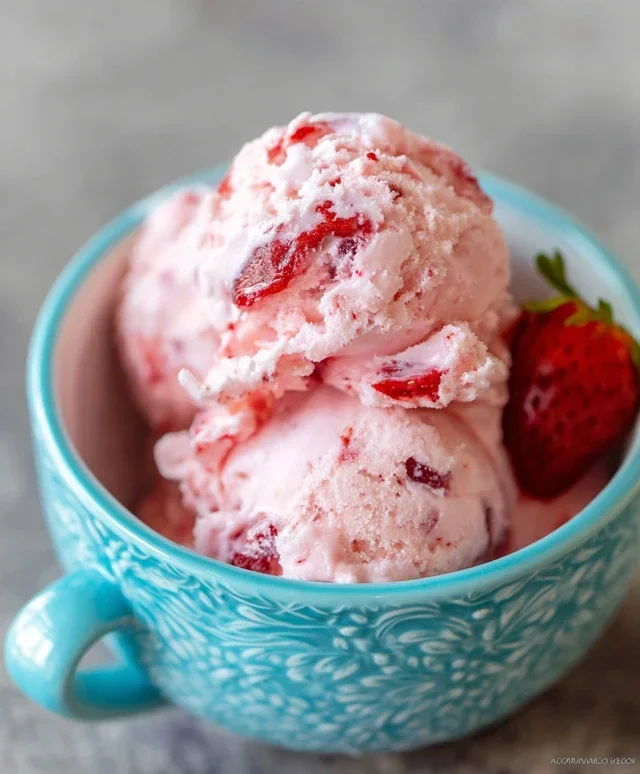
Easy Homemade Strawberry Ice Cream Recipe
Homemade strawberry ice cream is the taste of pure summer bliss. There’s something undeniably magical about that first spoonful of creamy, sweet, and slightly tart goodness. Forget the store-bought stuff; nothing compares to the vibrant, fresh flavor you get when you craft your very own batch. We all have those nostalgic memories tied to simple pleasures, and for many of us, that includes bowls of bright red, homemade strawberry ice cream. Its appeal lies in its natural sweetness and the burst of fruity deliciousness that instantly transports us to warmer days and carefree moments. What truly makes homemade strawberry ice cream special is the ability to control the ingredients, ensuring peak ripeness and vibrant flavor without artificial additives. Get ready to discover how easy it is to create this iconic frozen treat in your own kitchen!
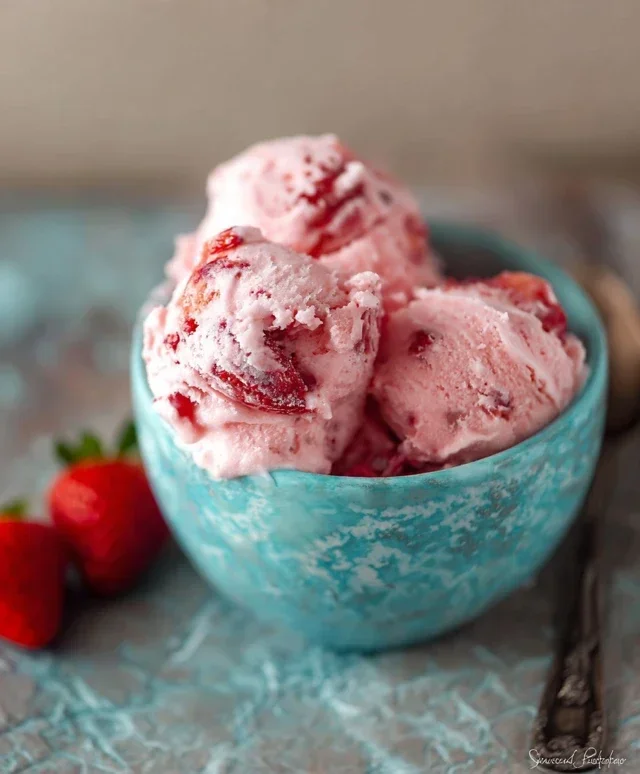
Homemade Strawberry Ice Cream
There’s something undeniably special about homemade ice cream. The creamy texture, the vibrant flavors, and the satisfaction of creating something delicious from scratch are unparalleled. And when it comes to summer flavors, nothing quite beats the sweet, slightly tart taste of fresh strawberries. This recipe for homemade strawberry ice cream is incredibly simple to make, requiring no special equipment beyond a blender or food processor and a bit of patience. The result is a luscious, creamy, and intensely fruity ice cream that will have you wondering why you ever bought it from the store. Forget those artificial flavors; this is the real deal, bursting with the essence of sun-ripened strawberries.
Ingredients:
Making the Strawberry Base
This is where the magic truly begin extracts. We’re going to create a wonderfully flavorful strawberry puree that forms the heart of our ice cream. The combination of fresh strawberries, a touch of honey for natural sweetness, granulated sugar for balance, and a hint of lemon juice to brighten the strawberry flavor is key. The lemon juice might seem counterintuitive in an ice cream, but it actually enhances the fruitiness and prevents the sweetness from becoming cloying.
1. Puree the Strawberries: In a blender or food processor, combine the hulled and diced strawberries, the 2 tablespoons of honey, the 1/2 cup of granulated sugar, and the 1 teaspoon of lemon juice. Blend these ingredients until you have a smooth and vibrant strawberry puree. You want to ensure there are no large chunks of strawberry remaining. For an even smoother texture, you can press the puree through a fine-mesh sieve at this stage to remove any tiny seeds, although this is entirely optional and depends on your preference. A few seeds add a rustic charm.
2. Chill the Strawberry Mixture: Transfer the strawberry puree to a bowl, cover it tightly, and refrigerate it for at least 1 hour, or until it is thoroughly chilled. This chilling step is crucial. A cold base will help the ice cream freeze faster and more evenly, leading to a creamier texture and preventing the formation of large ice crystals. The colder your base, the better your final ice cream will be.
Assembling the Ice Cream Base
Now that our strawberry component is perfectly chilled, it’s time to incorporate the creamy elements that will transform our puree into luscious ice cream. The combination of heavy whipping cream and half-and-half provides the perfect richness and balance of fat content for a smooth and decadent texture. The vanilla extract adds a subtle layer of warmth and complexity that complements the strawberry beautifully.
3. Combine Dairy and Flavor: Once the strawberry mixture is well-chilled, gently stir in the 1 cup of heavy whipping cream, the 1/2 cup of half-and-half, and the 1 teaspoon of vanilla extract. Whisk everything together until it’s fully incorporated and the mixture has a uniform pnon-alcoholic ale pink color. Be careful not to overmix at this stage; we just want to combine everything smoothly. Again, ensure this mixture is as cold as possible before proceeding.
The Freezing Process
This is where patience comes into play. Without an ice cream maker, we’ll rely on regular freezing and periodic stirring to achieve a creamy consistency. The goal is to break up any ice crystals that form as the mixture freezes, resulting in a smooth and scoopable ice cream.
4. Initial Freeze and Stirring: Pour the chilled strawberry ice cream base into a shallow, freezer-safe container. Place this container in the freezer. After about 45 minutes to 1 hour, the edges of the mixture should start to freeze. Remove the container from the freezer and use a fork or whisk to vigorously stir and break up the frozen parts, incorporating them into the still-liquid center. This process helps to aerate the mixture and break down ice crystals. Return the container to the freezer.
5. Repeat and Refine: Continue this process of freezing and stirring every 30-45 minutes for at least 3-4 hours, or until the ice cream reaches your desired consistency. The more you stir, the smoother and creamier your ice cream will be. You’ll notice the mixture gradually thickening and becoming more scoopable. The final stages will involve longer freezing periods between stirs as the ice cream solidifies. Once it’s firm enough to hold its shape, give it one final thorough stir, cover it tightly to prevent freezer burn and odor absorption, and let it freeze undisturbed for at least another 2-3 hours to fully set.
Enjoying your homemade creation is the best part. Let it soften slightly at room temperature for a few minutes before scooping for the perfect creamy texture. This homemade strawberry ice cream is a testament to the fact that delicious, high-quality ice cream can be made right in your own kitchen with just a few simple ingredients and a little bit of effort.
Conclusion:
There you have it – a simple yet incredibly rewarding recipe for homemade strawberry ice cream! The beauty of this recipe lies in its fresh, vibrant flavor derived from real strawberries, a stark contrast to store-bought alternatives often laden with artificial ingredients. It’s wonderfully creamy, delightfully sweet, and bursting with that quintessential summer strawberry taste. I’m confident you’ll find this homemade strawberry ice cream recipe a delightful addition to your dessert repertoire. It’s perfect for any occasion, from a casual family gathering to a special celebration.
Serving this delightful treat is easy! Enjoy it on its own, or consider topping it with fresh strawberry slices, a drizzle of balsamic glaze for a sophisticated twist, or even a sprinkle of chopped pistachios for added texture and flavor. For variations, feel free to experiment! Adding a splash of lemon juice can brighten the strawberry flavor further, or consider folding in a handful of dark chocolate chips for a classic pairing. Don’t be afraid to get creative and make it your own!
I truly encourage you to give this homemade strawberry ice cream a try. The process is surprisingly straightforward, and the results are undeniably delicious. You’ll be amazed at how simple it is to create such a gourmet-quality dessert in your own kitchen. Happy churning!
Frequently Asked Questions:
Can I make this strawberry ice cream without an ice cream maker?
Absolutely! While an ice cream maker ensures the smoothest texture, you can achieve delicious results without one. After preparing the base and chilling it thoroughly, pour it into a freezer-safe container. Every 30-45 minutes for the first 2-3 hours, remove the container from the freezer and vigorously whisk the mixture to break up ice crystals. This manual churning process will help create a creamier texture.
My strawberry ice cream isn’t as sweet as I’d like. Can I adjust the sweetness?
Yes, you can! The sweetness level is largely dependent on the ripeness of your strawberries. If your strawberries are less sweet, you might want to increase the sugar slightly. It’s best to taste the mixture before churning and adjust to your preference. You can also add a touch more sweetener (like honey or maple syrup, though this may alter the flavor slightly) after it’s churned and before the final freeze, if needed.
Homemade Strawberry Ice Cream
A simple and delicious homemade strawberry ice cream recipe using fresh ingredients. Perfect for a sweet treat on a warm day.
Ingredients
-
1 1/2 cups strawberries, hulled and diced
-
2 Tbsp honey
-
1/2 cup granulated sugar
-
1 tsp lemon juice
-
1 cup heavy whipping cream
-
1/2 cup half and half
-
1 tsp vanilla extract
Instructions
-
Step 1
In a bowl, combine the diced strawberries, honey, granulated sugar, and lemon juice. Mash slightly and let sit for 15-20 minutes to allow the flavors to meld and the strawberries to release their juices. -
Step 2
Pour the strawberry mixture into a blender or food processor. Blend until smooth. -
Step 3
In a separate bowl, whisk together the heavy whipping cream, half and half, and vanilla extract until just combined. -
Step 4
Pour the strawberry puree into the cream mixture and stir well to combine. -
Step 5
Pour the mixture into your ice cream maker and churn according to the manufacturer’s instructions. -
Step 6
Once churned, transfer the ice cream to an airtight container and freeze for at least 4 hours, or until firm.
Important Information
Nutrition Facts (Per Serving)
It is important to consider this information as approximate and not to use it as definitive health advice.
Allergy Information
Please check ingredients for potential allergens and consult a health professional if in doubt.